PPPoE LAN型払い出し設定

よくあるフレッツ系回線収容するときにPPPoE IP8で契約してルータなりFWなりで受ける構成を組むときのメモ。IOSはそれなりにやっているから良いとして,SRXやFortigateで最近構築することがあるのでメモを残す。

LAN払い出し型の場合,ルータ単体では実装は難しい(というか無理)なようで別途RADIUSサーバを準備する必要がある。(TACACS+でもいけるかなと思ったが,RAIDUSの「Framed-IP-Address/Framed-IP-Netmask」に該当するものが見当たらなかったので素直にFreeradiusをDebianに入れることにした。)

FreeRADIUS準備

Debian10にfreeradiusを入れる。公式を見ると4.0はめちゃくちゃ面倒だからただ使いなら3.xつかえとあったのでそれに従う。

参考) https://networkradius.com/packages/#fr32-debian-buster

# apt install freeradius -y

結構時間がかかるけれど,これで完了。次にclient.confの編集。

# vi /etc/freeradius/3.0/client.conf
# 以下追加
client 192.168.1.3 {                         # PPPoEサーバのIPアドレス
        secret = secret-key                  # 認証用Key
}

続いてPPP認証用のユーザ設定。

# vi /etc/freeradius/3.0/user
# 以下追加
radius-user Cleartext-Password := "rad-secret"
        Service-Type = Framed-User,
        Framed-Protocol = PPP,
        Framed-IP-Address = 10.10.10.1,
        Framed-IP-Netmask = 255.255.255.248

RADIUS再起動。

# systemctl restart freeradius

PPPoEサーバ準備

次にIOS XE17系でPPPoEサーバの準備。(以下抜粋)

radius server FreeRadius
 address ipv4 <radiusのIP> auth-port 1812 acct-port 1813
 key secret-key
!
aaa new-model
!
!
aaa group server radius PPPoE
 server name FreeRadius
 ip radius source-interface GigabitEthernet0/4
!

aaa authentication ppp default group PPPoE
aaa authorization network default group PPPoE
aaa accounting network default start-stop group PPPoE
!

bba-group pppoe FLETS
 virtual-template 1
!
interface Loopback1
 ip address 172.17.1.1 255.255.255.0
!
interface GigabitEthernet1                   # RADIUSサーバと通信するIF
 ip address 192.168.1.3 255.255.255.0
 duplex auto
 speed auto
!
interface GigabitEthernet3                   # PPPoE接続用IF
 no ip address
 duplex auto
 speed auto
 pppoe enable group FLETS
!
interface Virtual-Template1
 mtu 1454
 ip unnumbered Loopback1
 ppp authentication chap
!

PPPoEクライアント設定

IOS 15.x系

interface GigabitEthernet0/0
 no ip address
 pppoe enable group global
 pppoe-client dial-pool-number 1
!
interface GigabitEthernet0/1
 ip address 10.10.10.1 255.255.255.248
!
interface Dialer0
 ip unnumbered GigabitEthernet0/1
 encapsulation ppp
 dialer pool 1
 dialer-group 1
 ppp authentication chap callin
 ppp chap hostname radius-user
 ppp chap password 0 rad-secret
!
ip route 0.0.0.0 0.0.0.0 Dialer0
!
dialer-list 1 protocol ip permit

JUNOS

このまんま。

set interfaces ge-0/0/0 unit 0 encapsulation ppp-over-ether
set interfaces ge-0/0/1 unit 0 family inet address 10.10.10.1/29
set interfaces fxp0 unit 0
set interfaces pp0 unit 1 ppp-options chap default-chap-secret "$9$eZBMxdbwgZGiN-kP5Q9CuO1Ervx7V2oG"
set interfaces pp0 unit 1 ppp-options chap local-name radius-user
set interfaces pp0 unit 1 ppp-options chap passive
set interfaces pp0 unit 1 pppoe-options underlying-interface ge-0/0/0.0
set interfaces pp0 unit 1 pppoe-options auto-reconnect 10
set interfaces pp0 unit 1 pppoe-options client
set interfaces pp0 unit 1 family inet unnumbered-address ge-0/0/1.0
set routing-options static route 0.0.0.0/0 next-hop pp0.1

Fortigate

WANのインタフェースにネットワークアドレス部分を入れないと駄目のようで,設定上気持ちが悪い。(が仕方が無いらしい)

system_interface:
    - wan:
        vdom: "FG-traffic"
        mode: pppoe
        allowaccess: ping
        type: physical
        lldp-reception: disable
        role: wan
        snmp-index: 1
        ipunnumbered: 10.10.10.0
        username: "radius-user"
        pppoe-unnumbered-negotiate: disable
        password: ENC xxxx
    - internal:
        vdom: "FG-traffic"
        ip: 10.10.10.1 255.255.255.248
        allowaccess: ping
        type: hard-switch
        device-identification: enable
        lldp-reception: disable
        lldp-transmission: disable
        role: lan
        snmp-index: 10

なお,PPPoEではないが,この構成でIPSecを行う際に送信元IPの指定がGUIでは「Local ID」しか設定することができず,CLIで「localid-type」を「address」に指定しないとPhase1の認証がこける。ここでハマって1日費やした。

IOSのパスワード文字列のハッシュ化について

enable secret などで利用する暗号化を指定したいとき,クリアテキストを入力することができない。

Router(config)#enable secret ?
  0      Specifies an UNENCRYPTED password will follow
  5      Specifies a MD5 HASHED secret will follow
  8      Specifies a PBKDF2 HASHED secret will follow
  9      Specifies a SCRYPT HASHED secret will follow
  <0-9>  Encryption types not explicitly specified
  LINE   The UNENCRYPTED (cleartext) 'enable' secret
  level  Set exec level password


事前にアルゴリズムを指定すれば良いだけなのだが,では,実際にハッシュ化された文字列を予め用意するにはどうしたらよいのだろうと考えた。

Router(config)#enable algorithm-type ?
  md5     Encode the password using the MD5 algorithm
  scrypt  Encode the password using the SCRYPT hashing algorithm
  sha256  Encode the password using the PBKDF2 hashing algorithm

Type5(MD5)

MD5の場合,opensslコマンドで対応できそうだ。オプションは-1がMD5。

$ openssl passwd --help
Usage: passwd [options]
Valid options are:
 -help               Display this summary
 -in infile          Read passwords from file
 -noverify           Never verify when reading password from terminal
 -quiet              No warnings
 -table              Format output as table
 -reverse            Switch table columns
 -salt val           Use provided salt
 -stdin              Read passwords from stdin
 -6                  SHA512-based password algorithm
 -5                  SHA256-based password algorithm
 -apr1               MD5-based password algorithm, Apache variant
 -1                  MD5-based password algorithm
 -aixmd5             AIX MD5-based password algorithm
 -crypt              Standard Unix password algorithm (default)
 -rand val           Load the file(s) into the random number generator
 -writerand outfile  Write random data to the specified file

いざお試し。opensslコマンドで生成。

$ openssl passwd -1 "password"
$1$.cR/0KTx$pPUO/YlCknfEryhGL8vZ7/

ルータへ投入。


Router(config)#enable secret 5 $1$.cR/0KTx$pPUO/YlCknfEryhGL8vZ7/
ERROR: The secret you entered is not a valid encrypted secret.
To enter an UNENCRYPTED secret, do not specify type 5 encryption.
When you properly enter an UNENCRYPTED secret, it will be encrypted.

エラーになる・・・。saltが必要だった。改めて生成。

$ openssl passwd -salt `openssl rand -base64 3`  -1 password
$1$tCLN$fofh2RhTlDmwzXeGUh7x4.

ルータへ投入。MD5はもはや非推奨だぞとアラートが出るが無事に行けた。

Router(config)#enable secret 5 $1$tCLN$fofh2RhTlDmwzXeGUh7x4.
 WARNING: Command has been added to the configuration using a type 5 password. However, type 5 passwords will soon be deprecated. Migrate to a supported password type
Router(config)#
*May 11 06:39:25.460: %AAAA-4-CLI_DEPRECATED: WARNING: Command has been added to the configuration using a type 5 password. However, type 5 passwords will soon be deprecated. Migrate to a supported password type

Type8(PBKDF2)

PBKDF2はSHA256で繰り返しハッシュ化するもの。

opensslではハッシュ化できなさそうなので,pythonでやってみる。Passlibというライブラリがあるのでこれを使う。

なお,Cisco Communityを見ると以下のように記載されている。

Type 8 passwords are what Type 4 was meant to be, an upgraded Type 5!  Type 8 is hashed using PBKDF2, SHA-256, 80-bit salt, 20,000 iterations. While this is good, it is still vulnerable to brute-forcing since AES is easy to implement in (GPU) graphics cards. I have not proven it but I believe it is possible that the popular tool HashCat is able to decrypt these. In the running config standard Type 8 start with $8$.

https://community.cisco.com/t5/networking-documents/understanding-the-differences-between-the-cisco-password-secret/ta-p/3163238

80バイトのSaltということは10文字,2万Iterationで試行。

$ pip install passlib
Collecting passlib
  Downloading passlib-1.7.4-py2.py3-none-any.whl (525 kB)
     |????????????????????????????????| 525 kB 21.2 MB/s
Installing collected packages: passlib
Successfully installed passlib-1.7.4
$ python
>>> from passlib.hash import pbkdf2_sha256
>>> pbkdf2_sha256.using(rounds=20000, salt_size=10).hash("password")
'$pbkdf2-sha256$20000$cm6t9T6n9L73ng$7sCcdbt9sNLWj5h7.Jd.7cdyLwYqoPlFMIWV1..hjFc'
>>> pbkdf2_sha256.verify("password", '$pbkdf2-sha256$20000$cm6t9T6n9L73ng$7sCcdbt9sNLWj5h7.Jd.7cdyLwYqoPlFMIWV1..hjFc')
True
>>>

ハッシュ化成功した模様。salt以降をCiscoに登録。

Router(config)#enable secret 8 $8$cm6t9T6n9L73ng$7sCcdbt9sNLWj5h7.Jd.7cdyLwYqoPlFMIWV1..hjFc
Router(config)#end
Router#disable
Router>en
Password:
Password:
Password:
% Bad secrets

なんでだ・・・。なんどやってもダメで,Cisco側で登録したハッシュを逆にverifyしてもダメだった(方式が違うっぽい)。そこで,こんなの(ciscoPWDhasher)があったのでこれを使ってみることにした。

$ git clone https://github.com/BrettVerney/ciscoPWDhasher.git
$ cd ciscoPWDhasher
$ pip install scrypt passlib backports.pbkdf2
$ python3 ./ciscopwdhasher.py

+------------------------------------------------------------------------+
|    ____ _                 ____                                     _   |
|   / ___(_)___  ___ ___   |  _ \ __ _ ___ _____      _____  _ __ __| |  |
|  | |   | / __|/ __/ _ \  | |_) / _` / __/ __\ \ /\ / / _ \| '__/ _` |  |
|  | |___| \__ \ (_| (_) | |  __/ (_| \__ \__ \\ V  V / (_) | | | (_| |  |
|   \____|_|___/\___\___/  |_|   \__,_|___/___/ \_/\_/ \___/|_|  \__,_|  |
|                                                                        |
|           _   _           _                                            |
|          | | | | __ _ ___| |__   ___ _ __      .--.                    |
|          | |_| |/ _` / __| '_ \ / _ \ '__|    /.-. '----------.        |
|          |  _  | (_| \__ \ | | |  __/ |       \'-' .--"--""-"-'        |
|          |_| |_|\__,_|___/_| |_|\___|_|        '--'                    |
|                                                                        |
|  by: Brett Verney (@WiFiWizardOFOz)                      version: 0.1  |
+------------------------------------------------------------------------+

Select a hashing algorithm:

[1]  Type 5 (MD5)
[2]  Type 7 (XOR Cipher)
[3]  Type 8 (PBKDF2-HMAC-SHA256)
[4]  Type 9 (Scrypt)
[5]  Exit

Your selection: 3

Enter a Plain Text Password to convert: password
Your Cisco type 7 password is:   #これ多分type 8の間違い $8$L7qc2XluRN/CzI$t34L8AK8SWb8LUFeCNVQanveK/JwKozfuAtHuIRH6vc

ルータへ設定。

Router(config)#enable secret 8 
 
Router(config)#end
Router#disa
Router#disable
Router>en
Password:
Router#

無事成功。どうやらbase64のエンコード周りでCisco形式に変換してあげないとダメみたい(良くわからない)。

Type9(Scrypt)

現在推奨の方式。

Select a hashing algorithm:

[1]  Type 5 (MD5)
[2]  Type 7 (XOR Cipher)
[3]  Type 8 (PBKDF2-HMAC-SHA256)
[4]  Type 9 (Scrypt)
[5]  Exit

Your selection: 4

Enter a Plain Text Password to convert: password
Your Cisco type 9 password is: $9$KvAkztzB8xe7Am$n3st6bOSv2hzH7qTG/9RHUInJ0DlbSmtTqOHOtn99UM

同じようにルータへ設定。

Router(config)#$qc2XluRN/CzI$t34L8AK8SWb8LUFeCNVQanveK/JwKozfuAtHuIRH6vc
Router(config)#end
Router#disa
Router#disable
Router>en
Password:
Router#

問題無し!

素直に enable algorithm-type を使えという話だけれど,たまにはこういうことを調べるのも良いね。

no ip domain-lookupからの卒業

Smart Licenseのおかげでスイッチにおいてもip domain-lookupの設定が必要になった。(環境によりけりが,インターネットダイレクト構成では少なくとも必要)

これを入れるとコマンド打ち間違えの時にdomain-lookupが発動してしまい,暫しご歓談をタイムに陥ってしまう。ミスタイプなどしないS級エンジニアや,「少しくらいの時間ならお茶を飲みながら待ちますよ」という賢者ならまだしも,ミスタイプをしょっちゅうするし少しの待ち時間ももったいない私にとっては致命的。

ということで方法はないかと調べてみると,あったのねこんな所に

“no ip domain-lookup”の代わりに”transport preferred none”

http://blog.livedoor.jp/tokyo_z/archives/51247251.html

間違えたコマンド入力を名前解決をしない方法

http://networkerslog.blog137.fc2.com/blog-entry-335.html

Transport preferred

https://community.cisco.com/t5/switching/transport-preferred/td-p/1612979

オフィシャルサイトでは以下のように説明がある。IOS XRだけど,基本同じだろう。

Cisco IOS XR ソフトウェア は、認識できないコマンドはすべてホスト名であるものと想定し、接続を試みます。 プロトコルが none に設定されている場合、システムは EXEC プロンプトで入力された認識できないコマンドを無視し、接続を試みません。

https://www.cisco.com/c/ja_jp/td/docs/rt/servprovideredgert/asr9000aggregationservsrt/cr/035/b_sysman_cr42asr9k/b_sysman_cr42asr9k_chapter_010010.html#wp2132003449

何かの名残でこのような設定になっているのかな。ちなみにIOS XRではデフォルト無効になっているそうだ。IOSやIOS XEでも同じくデフォルト無効にして欲しい。

以下設定コマンド。これでコマンド以外の文字列が入力されてもlookupが走らない(正確にはtelnetコマンドが実行されない)。

line con 0
 transport preferred none
line vty 0 4
 transport preferred none

NW機器のTACACS+設定

およそ世間では情報が沢山あるので我が家の設定値のみ記載。

設定方針は次の通り。

  • 1号機は.20,2号機は.21,TACACSサーバがダウンしたらLocal認証(タイムアウトは5秒)
  • ログインできたら即特権(コマンド権限はTACACSサーバ側で握る)
  • 1号機を最初に記述,2号機を次に記述
  • aaaの設定でdefaultとして定義するものをよく見かけるが,自宅環境では不採用とし,各aaaの定義に名前を付ける。(仮にdefaultで定義すると全てのインタフェースに適用されるし,設定順番ミスるとそのままコマンドがはじかれるなどリスクがあると思う。ただし,line vty でのauthentication設定などは不要になるなど設定行は減る。)

Cisco IOS

!!! AAA有効
aaa new-model

!!! TACACSサーバ登録。aaa tacacs-server は非推奨になった模様。
tacacs server tacacs-sv1
 address ipv4 192.168.30.20
 key <tacacsサーバで設定したKey>
 timeout 5
tacacs server tacacs-sv2
 address ipv4 192.168.30.21
 key <tacacsサーバで設定したKey>
 timeout 5

!!! TACACSサーバグループ作成。
aaa group server tacacs+ TAC_SRV
 server name tacacs-sv1
 server name tacacs-sv2

!!! TACplusという名前でTAC_SRVで登録したTACACSサーバに問い合わせる。落ちてたらローカル認証。
aaa authentication login TACplus_authe group TAC_SRV local-case


!!! 実行権限をTACACSサーバに問い合わせる。落ちてたらローカル認証。
aaa authorization exec TACplus_autho_exec group TAC_SRV local

!!! 実行レベル15のコマンド実行権限をTACACSサーバに問い合わせる。落ちてたらローカル認証。
aaa authorization commands 15 TACplus_autho_cmd group TAC_SRV local

!!! コマンド実行ログをTACACSサーバへ送信。
aaa accounting commands 15 TACplus_acco start-stop group TAC_SRV


line vty 0 4
 exec-timeout 0 0
 authorization commands 15 TACplus_autho_cmd
 authorization exec TACplus_autho_exec
 logging synchronous
 login authentication TACplus_authe
 transport input ssh

Cisco ASA

ASAの場合はIOSとは若干違うが,基本的な定義の流れは同じ。

aaa-server TACplus protocol tacacs+
 reactivation-mode timed
 max-failed-attempts 2
aaa-server TACplus (mgmtside) host 192.168.30.20
 key *****
aaa-server TACplus (mgmtside) host 192.168.30.21
 key *****

!!! SSH接続時にTACACS→LOCALという順で認証
aaa authentication ssh console TACplus LOCAL

!!! 特権
aaa authentication enable console TACplus LOCAL

aaa authorization command TACplus LOCAL
aaa accounting command privilege 15 TACplus

!!! 
aaa authorization exec authentication-server auto-enable
aaa authentication login-history

以上。

TACACS+サーバ構築

概要

宅内環境の認証をTACACS化しようと,まずはTACACS+サーバを2台立てる。構成は次の通り。各機器の管理IFと同じセグメントにTACACSサーバを2台建てる。

OpenStack上にDebianイメージでインスタンスを1つ。冗長化のためESXi上にUbuntuのVMをたてて2号機とする。(なぜOSが違うかというと,ESXi上にDebian10のイメージがなかっただけで特に他意はなし)

TACACS+はtac_plusを利用する。元はこれ(https://www.shrubbery.net/tac_plus/)だと思うのだが,公開が終わっているっぽい。facebookがGithubでforkしたものを公開していたので,Ubuntu側ではここからソースをもってきてコンパイルしてインストールした。’Debianはリポジトリからインストールできた。)

インストール

Debian 10でのインストール方法

aptで一発。

# apt install tacacs+

Debain11でのインストール方法

11にはまだパッケージがなかったためソースからコンパイル。

# apt install git build-essential flex bison libwrap0-dev
$ git clone https://github.com/facebook/tac_plus.git
$ cd tac_plus/tacacs-F4.0.4.28
$ ./configure
$ make
# make install

続いて必要なファイルの準備。

サービス起動ファイル /etc/init.d/tacacs_plus

#!/bin/sh
### BEGIN INIT INFO
# Provides:          tacacs+
# Required-Start:    $network $local_fs $syslog $remote_fs
# Required-Stop:     $network $local_fs $remote_fs
# Should-Start:      $named
# Default-Start:     2 3 4 5
# Default-Stop:      0 1 6
# Short-Description: TACACS+ authentication daemon
### END INIT INFO

PATH=/usr/local/sbin:/usr/local/bin:/sbin:/bin:/usr/sbin:/usr/bin

DAEMON=/usr/local/sbin/tac_plus
NAME="tacacs+"
DESC="TACACS+ authentication daemon"
LOGDIR=/var/log/
STARTTIME=1

PIDFILE=/var/run/tac_plus.pid

test -x $DAEMON || exit 0

. /lib/lsb/init-functions

# Default options, these can be overriden by the information
# at /etc/default/$NAME
DAEMON_OPTS="-C /etc/tacacs+/tac_plus.conf"          # Additional options given to the server


LOGFILE=$LOGDIR/tac_plus.log  # Server logfile

# Include defaults if available
if [ -f /etc/default/$NAME ] ; then
        . /etc/default/$NAME
fi

# Check that the user exists (if we set a user)
# Does the user exist?
if [ -n "$DAEMONUSER" ] ; then
    if getent passwd | grep -q "^$DAEMONUSER:"; then
        # Obtain the uid and gid
        DAEMONUID=`getent passwd |grep "^$DAEMONUSER:" | awk -F : '{print $3}'`
        DAEMONGID=`getent passwd |grep "^$DAEMONUSER:" | awk -F : '{print $4}'`
    else
        log_failure_msg "The user $DAEMONUSER, required to run $NAME does not exist."
        exit 1
    fi
fi


set -e

running_pid() {
# Check if a given process pid's cmdline matches a given name
    pid=$1
    name=$2
    [ -z "$pid" ] && return 1
    [ ! -d /proc/$pid ] &&  return 1
    cmd=`cat /proc/$pid/cmdline | tr "\000" "\n"|head -n 1 |cut -d : -f 1`
    # Is this the expected server
    [ "$cmd" != "$name" ] &&  return 1
    return 0
}

running() {
# Check if the process is running looking at /proc
# (works for all users)

    # No pidfile, probably no daemon present
    [ ! -f "$PIDFILE" ] && return 1
    pid=`cat $PIDFILE`
    running_pid $pid $DAEMON || return 1
    return 0
}

start_server() {
# Start the process using the wrapper
    if check_config_quiet ; then
         start-stop-daemon --start --quiet --pidfile $PIDFILE \
                --exec $DAEMON -- $DAEMON_OPTS
         errcode=$?
         return $errcode
    else
         return $?
    fi

}

stop_server() {
    killproc -p $PIDFILE $DAEMON
    return $?
}

reload_server() {
    if check_config_quiet ; then
         [ ! -f "$PIDFILE" ] && return 1
         pid=`cat $PIDFILE` # This is the daemon's pid
         # Send a SIGHUP
         kill -1 $pid
         return $?
    else
         return $?
    fi
}

check_config() {
        $DAEMON -P $DAEMON_OPTS
        return $?
}

check_config_quiet() {
        $DAEMON -P $DAEMON_OPTS >/dev/null 2>&1
        return $?
}

force_stop() {
# Force the process to die killing it manually
        [ ! -e "$PIDFILE" ] && return
        if running ; then
                kill -15 $pid
        # Is it really dead?
                sleep "$DIETIME"s
                if running ; then
                        kill -9 $pid
                        sleep "$DIETIME"s
                        if running ; then
                                echo "Cannot kill $NAME (pid=$pid)!"
                                exit 1
                        fi
                fi
        fi
        rm -f $PIDFILE
}


case "$1" in
  start)
        log_daemon_msg "Starting $DESC " "$NAME"
        # Check if it's running first
        if running ;  then
            log_progress_msg "apparently already running"
            log_end_msg 0
            exit 0
        fi
        if start_server ; then
            # NOTE: Some servers might die some time after they start,
            # this code will detect this issue if STARTTIME is set
            # to a reasonable value
            [ -n "$STARTTIME" ] && sleep $STARTTIME # Wait some time
            if  running ;  then
                # It's ok, the server started and is running
                log_end_msg 0
            else
                # It is not running after we did start
                log_end_msg 1
            fi
        else
            # Either we could not start it
            log_end_msg 1
        fi
        ;;
  stop)
        log_daemon_msg "Stopping $DESC" "$NAME"
        if running ; then
            # Only stop the server if we see it running
                        errcode=0
            stop_server || errcode=$?
            log_end_msg $errcode
        else
            # If it's not running don't do anything
            log_progress_msg "apparently not running"
            log_end_msg 0
            exit 0
        fi
        ;;
  force-stop)
        # First try to stop gracefully the program
        $0 stop
        if running; then
            # If it's still running try to kill it more forcefully
            log_daemon_msg "Stopping (force) $DESC" "$NAME"
                        errcode=0
            force_stop || errcode=$?
            log_end_msg $errcode
        fi
        ;;
  restart|force-reload)
        log_daemon_msg "Restarting $DESC" "$NAME"
                errcode=0
        stop_server || errcode=$?
        # Wait some sensible amount, some server need this
        [ -n "$DIETIME" ] && sleep $DIETIME
        start_server || errcode=$?
        [ -n "$STARTTIME" ] && sleep $STARTTIME
        running || errcode=$?
        log_end_msg $errcode
        ;;
  status)

        log_daemon_msg "Checking status of $DESC" "$NAME"
        if running ;  then
            log_progress_msg "running"
            log_end_msg 0
        else
            log_progress_msg "apparently not running"
            log_end_msg 1
            exit 1
        fi
        ;;
  # Use this if the daemon cannot reload
  reload)
        log_daemon_msg "Reloading $DESC configuration files" "$NAME"
        if reload_server ; then
                if running ; then
                        log_end_msg 0
                else
                        log_progress_msg "$NAME not running"
                        log_end_msg 1
                fi
        else
                log_progress_msg "Reload failled"
                log_end_msg 1
        fi
        ;;
  check)
        check_config
        if [ X$? = "X0" ]
        then
                log_daemon_msg "Checking $DESC configuration files successful" "$NAME"
        else
                log_daemon_msg "Checking $DESC configuration files failed"
                exit 1
        fi
        ;;
  *)
        N=/etc/init.d/tacacs_plus
        echo "Usage: $N {start|stop|force-stop|restart|reload|force-reload|status|check}" >&2
        exit 1
        ;;
esac

exit 0

アカウンティングログファイル作成

# touch /var/log/tac_plus.acct

tacacs+設定ファイル編集(2台共通)

/etc/tacacs+/tac_plus

以下設定例。今回はとりあえず設定ファイル中にユーザを記述する設定方式をとったが,仕事ではやらないように注意。パスワードのハッシュ化は 「openssl passwd – 5」 (SHA256)で生成。

# アカウンティング用ログファイル指定
accounting file = /var/log/tac_plus.acct


# <サーバと通信するための鍵を記述>
key = tacacs_key

user = networkmanager {
        name = "Network Manager"
        member = admin
        login = des <ハッシュ化パスワード>
        enable = des <ハッシュ化enable>
}

user = networkoperator {
        name = "Read only user"
        member = operator
        login = des <ハッシュ化パスワード>
        enable = des <ハッシュ化enable>
}

# 管理者用グループ。Privilage15。
group = admin {
        default service = permit
        service = exec {
                priv-lvl = 15
        }

# オペレータ用グループ。showコマンドのみ利用可能
group = operator {
        default service = deny
        service = exec {
                priv-lvl = 15
        }
        cmd = show {
                permit .*
        }
        cmd = exit {
                permit .*
        }
}

TACACS+起動

# service tacacs_plus start

以上。

次はNW機器側の設定。

Catalyst3560CでGREトンネル

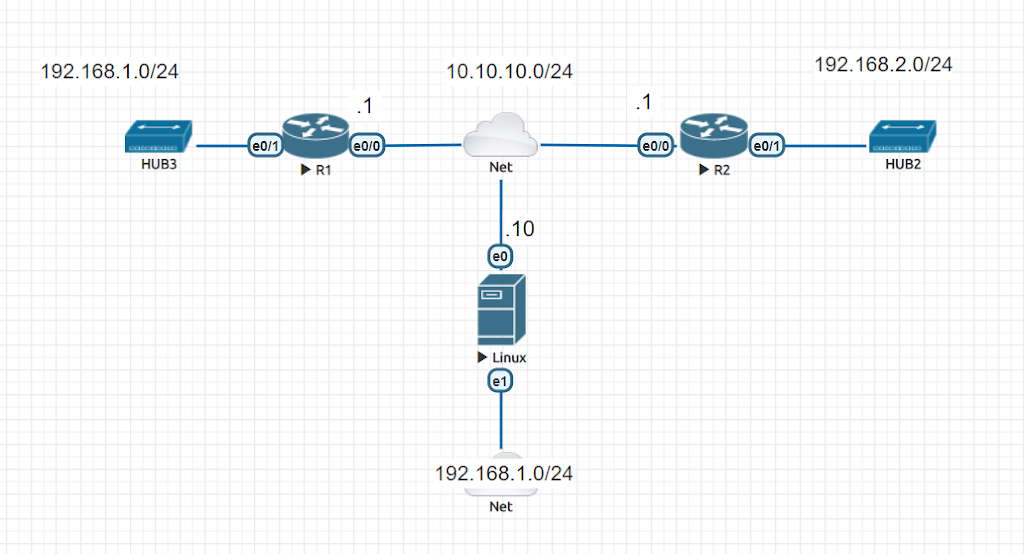
とある検証でL3SWでGREトンネルのみ張る設定を確認した。普通にいけるかなと思ったが,keepaliveでひっかかったのでメモ。

基本的には,Vlan IFにIPアドレスを設定し,tunnel source / destination でそれぞれ指定すれば完了。ただし,Keepaliveを設定するとDownとなる。デバッグをとっても応答が返ってこず(recieveが無い)Down判定されていた。

interface Tunnel1
 ip address 192.168.254.2 255.255.255.252
 keepalive 5 2
 tunnel source Vlan1
 tunnel destination 192.168.10.1

なんでだろうなと調べてみると,以下の一文を見つけた。

Support is available for gre ip tunnel mode. The tunnel source can be loopback and Layer 3 (physical or Etherchannel) interfaces only.

https://www.cisco.com/c/dam/en/us/td/docs/switches/lan/catalyst3850/software/release/16-1/workflows/gre-feature-guide.pdf

なるほど。型番もバージョンも違うけれどこれっぽい。試しにip routingを有効にしてLoopback IFを追加,対向のLoに対するスタティックルート追加したところ無事にkeepalive有りでトンネルが張れた。

枯れた技術だけれど,結構まだハマるところがあるという。精進が足りませんね。

Cisco IOSで設定のロールバック

先日のメモではIOSでのアーカイブについて触れたけど,今回は安全にロールバックを行う方法ついて確認。

そもそもCisco IOSでの設定即時反映は便利である反面,ミスったときの影響が大きいという問題があると感じていた。その点,JunosやVyOSのようなその他のNW OSで実装されている,設定反映前の比較やロールバックタイマーは運用を担っている人達からすると非常に助かる機能だと思う。
IOSはどうしてこの機能を盛り込まないのだろうと思っていたけれど,結構前からそれに類するコマンドはあったようで,私は知りませんでした。(12.2位からあったようで・・・)
<configure replace コマンド>
設定をロールバックするときはこのコマンドを使う。
こちらによると,稼働中のConfigとの差分のみを適用してくれるとのことで,copy xxx running-conifg のようにまるっと上書きよりも安全に変更できるそうだ。(コマンドリファレンスには置き換えるとしか書いていないけど,そうなのか)

試しにホスト名を変えてロールバックをしてみる。

R1#conf t
Enter configuration commands, one per line. End with CNTL/Z.
R1(config)#hostname Router1
Router1(config)#end
Router1#show archive
The maximum archive configurations allowed is 10.
The next archive file will be named ftp://10.10.10.10/Router1--3605
Archive # Name
1 ftp://10.10.10.10/R1-May--8-01-53-04.568-3595
2 ftp://10.10.10.10/R1-May--8-01-56-04.701-3596
3 ftp://10.10.10.10/R1-May--8-01-59-04.848-3597
4 ftp://10.10.10.10/R1-May--8-02-02-04.993-3598
5 ftp://10.10.10.10/R1-May--8-02-05-05.127-3599
6 ftp://10.10.10.10/R1-May--8-02-08-05.277-3600
7 ftp://10.10.10.10/R1-May--8-02-11-05.411-3601
8 ftp://10.10.10.10/R1-May--8-02-14-05.568-3602
9 ftp://10.10.10.10/R1-May--8-02-17-06.489-3603
10 ftp://10.10.10.10/R1-May--8-02-20-07.340-3604 <- Most Recent

ホスト名がR1からRouter1へ変わったので一つ前のArchive9へロールバックする。

Router1#configure replace ftp://10.10.10.10/R1-May--8-02-17-06.489-3603
This will apply all necessary additions and deletions
to replace the current running configuration with the
contents of the specified configuration file, which is
assumed to be a complete configuration, not a partial
configuration. Enter Y if you are sure you want to proceed. ? [no]: yes # 確認で「yes」と入力
Loading R1-May--8-02-17-06.489-3603 !
[OK - 1105/4096 bytes]

Loading R1-May--8-02-17-06.489-3603 !
[OK - 1105/4096 bytes]

Total number of passes: 1
Rollback Done

R1#

R1へ戻った。戻したい状態が明確なので,hostname R1 と設定を変更するよりも安全に戻せる。
ただし,これは即時反映のため,一定時間で元に戻したい場合は,さらにオプションで「 trigger timer <1-120(min)> 」をつけて何分後に元に戻すかを指定する。
これで,「うわぁ!ロールバック元間違えた!」という時にも安心していられる(?)。

trigger timer オプションをつけて実行し,問題なければ,「configure confirm」で確定してロールバック完了となる。

以下は,ロールバック実行/1分後にロールバック自体を元に戻す流れ。

Switch1#configure replace ftp://10.10.10.10/R1-May--8-02-47-14.947-3616 revert trigger timer 1    # 1分後にロールバックを元にもどす
Writing Switch1-May--8-02-47-53.701-3618 Rollback Confirmed Change: Backing up current running config to ftp://10.10.10.10/Switch1-May--8-02-47-53.701-3618

This will apply all necessary additions and deletions
to replace the current running configuration with the
contents of the specified configuration file, which is
assumed to be a complete configuration, not a partial
configuration. Enter Y if you are sure you want to proceed. ? [no]: yes
Loading R1-May--8-02-47-14.947-3616 !
[OK - 1105/4096 bytes]

*May 8 02:47:53.814: %ARCHIVE_DIFF-5-ROLLBK_CNFMD_CHG_BACKUP: Backing up current running config to ftp://10.10.10.10/Switch1-May--8-02-47-53.701-3618
Loading R1-May--8-02-47-14.947-3616 !
[OK - 1105/4096 bytes]

Total number of passes: 1
Rollback Done

R1#Rollback Confirmed Change: Rollback will begin in one minute. # ホスト名がR1に戻った。ロールバック完了。
Enter "configure confirm" if you wish to keep what you've configured
*May 8 02:47:55.655: Rollback:Acquired Configuration lock.
R1#
*May 8 02:47:55.771: %ARCHIVE_DIFF-5-ROLLBK_CNFMD_CHG_START_ABSTIMER: User: console(Priv: 15, View: 0): Scheduled to rollback to config ftp://10.10.10.10/Switch1-May--8-02-47-53.701-3618 in 1 minutes
*May 8 02:47:55.775: %ARCHIVE_DIFF-5-ROLLBK_CNFMD_CHG_WARNING_ABSTIMER: System will rollback to config ftp://10.10.10.10/Switch1-May--8-02-47-53.701-3618 in one minute. Enter "configure confirm" if you wish to keep what you've configured
R1#Rollback Confirmed Change: rolling to:ftp://10.10.10.10/Switch1-May--8-02-47-53.701-3618

Loading Switch1-May--8-02-47-53.701-3618 !
[OK - 1110/4096 bytes]

Loading Switch1-May--8-02-47-53.701-3618 !
[OK - 1110/4096 bytes]

!Pass 1
!List of Rollback Commands:
no hostname R1
hostname Switch1
end


Total number of passes: 1
Rollback Done

*May 8 02:48:55.776: %ARCHIVE_DIFF-5-ROLLBK_CNFMD_CHG_ROLLBACK_START: Start rolling to: ftp://10.10.10.10/Switch1-May--8-02-47-53.701-3618
*May 8 02:48:55.852: Rollback:Acquired Configuration lock.
R1#
Switch1# # 1分経過したためロールバックがもどされ,ホスト名が Switch1 に戻った。

ロールバックを確定する流れは以下のようになる。

Switch1#configure replace ftp://10.10.10.10/R1-May--8-02-47-14.947-3616 revert trigger timer 1
Writing Switch1-May--8-02-55-47.783-3621 Rollback Confirmed Change: Backing up current running config to ftp://10.10.10.10/Switch1-May--8-02-55-47.783-3621

This will apply all necessary additions and deletions
to replace the current running configuration with the
contents of the specified configuration file, which is
assumed to be a complete configuration, not a partial
configuration. Enter Y if you are sure you want to proceed. ? [no]: yes
Loading R1-May--8-02-47-14.947-3616 !
[OK - 1105/4096 bytes]

*May 8 02:55:47.855: %ARCHIVE_DIFF-5-ROLLBK_CNFMD_CHG_BACKUP: Backing up current running config to ftp://10.10.10.10/Switch1-May--8-02-55-47.783-3621
Loading R1-May--8-02-47-14.947-3616 !
[OK - 1105/4096 bytes]

Total number of passes: 1
Rollback Done

R1#Rollback Confirmed Change: Rollback will begin in one minute.
Enter "configure confirm" if you wish to keep what you've configured

*May 8 02:55:49.323: Rollback:Acquired Configuration lock.
R1#
R1#
*May 8 02:55:49.427: %ARCHIVE_DIFF-5-ROLLBK_CNFMD_CHG_START_ABSTIMER: User: console(Priv: 15, View: 0): Scheduled to rollback to config ftp://10.10.10.10/Switch1-May--8-02-55-47.783-3621 in 1 minutes
*May 8 02:55:49.431: %ARCHIVE_DIFF-5-ROLLBK_CNFMD_CHG_WARNING_ABSTIMER: System will rollback to config ftp://10.10.10.10/Switch1-May--8-02-55-47.783-3621 in one minute. Enter "configure confirm" if you wish to keep what you've configured
R1#
R1#configure confirm
R1#
*May 8 02:55:55.567: %ARCHIVE_DIFF-5-ROLLBK_CNFMD_CHG_CONFIRM: User: console: Confirm the configuration change
R1#

今後はこれを活用していきたい。

もう1点良いと思うところは,ロールバック手順で設定変更を行えば,Configの投入順序を気にしなくても良いという点。
例えばIPSecの設定で,transform-set を先に設定してからcrypto mapの中で定義しなくてはならないが,そういったところを意識しなくても良い。
流し込みミスと併せて,事前に流し込みの順序を考える必要がないというのは結構利点だと思う。
R1(config-crypto-map)#set transform-set TS
%ERROR: transform set with tag "TS" does not exist.

こういうことが防げる。

IOSの設定ファイルをFTPサーバへ保存して世代管理する。

Cisco IOSでConfigの世代管理をターミナルソフトでログ出力してローカル保存することから脱却したいと考え,AnsibleやNetconfなども考えたが今の現場では人力設定変更からの脱却がなかなかに難しい。(政治的にも運用的にもスキルセット的にも)

ということで,現行の環境をできるだけそのままに新しい機能では無いけど,「archive」コマンドで少しは幸せになれそうな気がしたので検証。

今回の検証環境はシンプルに,ルータ2台,FTPサーバ1台とする。

FTPサーバ(10.10.10.10)へConfigをアーカイブする

「archive」コマンドはマニュアルでも実行でき,設定しておけば自動で指定した場所へConfigを保存してくれる。デフォルトでは10世代まで保存となっており,maximumオプションで1~14まで指定ができる。

IOSのコンフィギュレーション アーカイブ

図のR1とR2に以下定義を入れる。

! FTPの基本設定
ip ftp source-interface Ethernet0/0
ip ftp username user
ip ftp password Test123

! アーカイブ設定
archive
path ftp://10.10.10.10/$h # $h は機器のホスト名
write-memory # 設定保存時にアーカイブ実行
time-period 3 # アーカイブを実行するタイミングの指定。今回は検証なので3分とした。

設定保存時と定期的にアーカイブをする設定を入れたが,time-periodはアーカイブをしたタイミングを起点に何分後という説明だったので,自動と手動のどちらも見るのか気になり確認をしたところ,archiveを設定した時点から定期的に取得するらしく,「archive config」コマンドで手動で実行したアーカイブは無視されていた。

R1#show archive
The maximum archive configurations allowed is 10.
The next archive file will be named ftp://10.10.10.10/R1--9
Archive # Name
1 ftp://10.10.10.10/R1-Apr-30-14-27-36.582-0
2 ftp://10.10.10.10/R1-Apr-30-14-28-49.035-1 # archiveコマンド設定後,最初の自動アーカイブ
3 ftp://10.10.10.10/R1-Apr-30-14-31-50.160-2 # 初回から3分後,2回目のアーカイブ
4 ftp://10.10.10.10/R1-Apr-30-14-34-51.091-3 # 3回目の自動アーカイブ
5 ftp://10.10.10.10/R1-Apr-30-14-34-59.006-4 # 「archive config」コマンドで手動でアーカイブを実行
6 ftp://10.10.10.10/R1-Apr-30-14-35-09.006-5 # 「archive config」コマンドで手動でアーカイブを実行
7 ftp://10.10.10.10/R1-Apr-30-14-37-52.197-6 # 4回目の自動アーカイブ
8 ftp://10.10.10.10/R1-Apr-30-14-39-17.723-7 # 「archive config」コマンドで手動でアーカイブを実行
9 ftp://10.10.10.10/R1-Apr-30-14-40-53.180-8 < -- Most Recent

この構成にすることでアーカイブと対となるロールバックも可能になる。

例えば,LAN側インタフェースの設定を入れたあと,誤って設定を消してしまった場合,「configure replace」コマンドでロールバックを行うことができる。

R1#show ip
*Apr 30 14:51:51.064: %LINK-3-UPDOWN: Interface Ethernet0/1, changed state to up
*Apr 30 14:51:52.072: %LINEPROTO-5-UPDOWN: Line protocol on Interface Ethernet0/1, changed state to up
R1#show ip int brie
Interface IP-Address OK? Method Status Protocol
Ethernet0/0 10.10.10.1 YES manual up up
Ethernet0/1 192.168.1.1 YES manual up up
Ethernet0/2 unassigned YES unset administratively down down
Ethernet0/3 unassigned YES unset administratively down down
R1#
R1#copy run startup-config
Destination filename [startup-config]?
Building configuration...
[OK]
Writing R1-Apr-30-14-51-57.355-12
R1#
R1#conf t
Enter configuration commands, one per line. End with CNTL/Z.
R1(config)#default interface e0/1 #やっちまった!!!
Interface Ethernet0/1 set to default configuration
R1(config)#do show ip int brie
Interface IP-Address OK? Method Status Protocol
Ethernet0/0 10.10.10.1 YES manual up up
Ethernet0/1 unassigned YES TFTP up up
Ethernet0/2 unassigned YES unset administratively down down
Ethernet0/3 unassigned YES unset administratively down down

手動で簡単に戻せるレベルだが,せっかくアーカイブをとっているので一つ前の設定へロールバックする。

R1#show archive
The maximum archive configurations allowed is 10.
The next archive file will be named ftp://10.10.10.10/R1-<timestamp>-15
Archive # Name
1 ftp://10.10.10.10/R1-Apr-30-14-35-09.006-5
2 ftp://10.10.10.10/R1-Apr-30-14-37-52.197-6
3 ftp://10.10.10.10/R1-Apr-30-14-39-17.723-7
4 ftp://10.10.10.10/R1-Apr-30-14-40-53.180-8
5 ftp://10.10.10.10/R1-Apr-30-14-43-54.061-9
6 ftp://10.10.10.10/R1-Apr-30-14-46-54.980-10
7 ftp://10.10.10.10/R1-Apr-30-14-49-56.023-11
8 ftp://10.10.10.10/R1-Apr-30-14-51-57.355-12
9 ftp://10.10.10.10/R1-Apr-30-14-52-56.856-13
10 ftp://10.10.10.10/R1-Apr-30-14-55-58.039-14 <- Most Recent

一つ前は「ftp://10.10.10.10/R1-Apr-30-14-52-56.856-13」なので,これを指定してロールバックを実行する。

R1#configure replace ftp://10.10.10.10/R1-Apr-30-14-52-56.856-13
This will apply all necessary additions and deletions
to replace the current running configuration with the
contents of the specified configuration file, which is
assumed to be a complete configuration, not a partial
configuration. Enter Y if you are sure you want to proceed. ? [no]: yes
Loading R1-Apr-30-14-52-56.856-13 !
[OK - 1106/4096 bytes]

Loading R1-Apr-30-14-52-56.856-13 !
[OK - 1106/4096 bytes]

Total number of passes: 1
Rollback Done

R1#
*Apr 30 15:00:31.984: Rollback:Acquired Configuration lock.
R1#show ip int brie
Interface IP-Address OK? Method Status Protocol
Ethernet0/0 10.10.10.1 YES manual up up
Ethernet0/1 192.168.1.1 YES TFTP up up
Ethernet0/2 unassigned YES unset administratively down down
Ethernet0/3 unassigned YES unset administratively down down
R1#show arc
R1#show archive
The maximum archive configurations allowed is 10.
The next archive file will be named ftp://10.10.10.10/R1-<timestamp>-16
Archive # Name
1 ftp://10.10.10.10/R1-Apr-30-14-37-52.197-6
2 ftp://10.10.10.10/R1-Apr-30-14-39-17.723-7
3 ftp://10.10.10.10/R1-Apr-30-14-40-53.180-8
4 ftp://10.10.10.10/R1-Apr-30-14-43-54.061-9
5 ftp://10.10.10.10/R1-Apr-30-14-46-54.980-10
6 ftp://10.10.10.10/R1-Apr-30-14-49-56.023-11
7 ftp://10.10.10.10/R1-Apr-30-14-51-57.355-12
8 ftp://10.10.10.10/R1-Apr-30-14-52-56.856-13
9 ftp://10.10.10.10/R1-Apr-30-14-55-58.039-14
10 ftp://10.10.10.10/R1-Apr-30-14-58-59.227-15 <- Most Recent
R1#

無事に設定はもどり,アーカイブ番号は戻るのではなく更新される。

いちいちどの定義を入れ直さなくてはダメなのか,という確認が不要なので便利だと思うし,運用に入った環境では人的ミスの削減にもつながるはず。
ちなみにアーカイブの差分も以下コマンドで確認できる。

R11#$R11-Apr-30-15-25-28.087-24 ftp://10.10.10.10/R1-Apr-30-15-23-03.315-23
Loading R11-Apr-30-15-25-28.087-24 !
[OK - 1106/4096 bytes]

Loading R1-Apr-30-15-23-03.315-23 !
[OK - 1105/4096 bytes]
!Contextual Config Diffs:
+hostname R1
-hostname R11

なお,FTPサーバ側にもちゃんとファイルが保存されている。

[user@localhost ~]$ ls -lrt
合計 128
-rw-r--r--. 1 user user 1093 4月 30 10:27 R1-Apr-30-14-27-36.582-0
-rw-r--r--. 1 user user 1073 4月 30 10:28 R2-Apr-30-14-28-22.973-1
-rw-r--r--. 1 user user 1093 4月 30 10:28 R1-Apr-30-14-28-49.035-1
-rw-r--r--. 1 user user 1073 4月 30 10:29 R2-Apr-30-14-29-06.901-2
-rw-r--r--. 1 user user 1093 4月 30 10:31 R1-Apr-30-14-31-50.160-2
-rw-r--r--. 1 user user 1073 4月 30 10:32 R2-Apr-30-14-32-08.023-3
-rw-r--r--. 1 user user 1093 4月 30 10:34 R1-Apr-30-14-34-51.091-3
-rw-r--r--. 1 user user 1093 4月 30 10:34 R1-Apr-30-14-34-59.006-4
-rw-r--r--. 1 user user 1093 4月 30 10:35 R1-Apr-30-14-35-09.006-5
-rw-r--r--. 1 user user 1073 4月 30 10:35 R2-Apr-30-14-35-08.939-4
-rw-r--r--. 1 user user 1093 4月 30 10:37 R1-Apr-30-14-37-52.197-6
-rw-r--r--. 1 user user 1073 4月 30 10:38 R2-Apr-30-14-38-09.972-5
-rw-r--r--. 1 user user 1093 4月 30 10:39 R1-Apr-30-14-39-17.723-7
-rw-r--r--. 1 user user 1093 4月 30 10:40 R1-Apr-30-14-40-53.180-8
-rw-r--r--. 1 user user 1073 4月 30 10:41 R2-Apr-30-14-41-10.819-6
-rw-r--r--. 1 user user 1093 4月 30 10:43 R1-Apr-30-14-43-54.061-9
-rw-r--r--. 1 user user 1073 4月 30 10:44 R2-Apr-30-14-44-10.959-7
-rw-r--r--. 1 user user 1093 4月 30 10:46 R1-Apr-30-14-46-54.980-10
-rw-r--r--. 1 user user 1073 4月 30 10:47 R2-Apr-30-14-47-11.101-8
-rw-r--r--. 1 user user 1093 4月 30 10:49 R1-Apr-30-14-49-56.023-11
-rw-r--r--. 1 user user 1073 4月 30 10:50 R2-Apr-30-14-50-11.460-9
-rw-r--r--. 1 user user 1106 4月 30 10:51 R1-Apr-30-14-51-57.355-12
-rw-r--r--. 1 user user 1106 4月 30 10:52 R1-Apr-30-14-52-56.856-13
-rw-r--r--. 1 user user 1073 4月 30 10:53 R2-Apr-30-14-53-11.594-10
-rw-r--r--. 1 user user 1083 4月 30 10:55 R1-Apr-30-14-55-58.039-14
-rw-r--r--. 1 user user 1073 4月 30 10:56 R2-Apr-30-14-56-11.761-11
-rw-r--r--. 1 user user 1083 4月 30 10:58 R1-Apr-30-14-58-59.227-15
-rw-r--r--. 1 user user 1073 4月 30 10:59 R2-Apr-30-14-59-11.901-12
-rw-r--r--. 1 user user 1105 4月 30 11:02 R1-Apr-30-15-02-00.102-16
-rw-r--r--. 1 user user 1073 4月 30 11:02 R2-Apr-30-15-02-12.252-13
-rw-r--r--. 1 user user 1105 4月 30 11:05 R1-Apr-30-15-05-00.981-17
-rw-r--r--. 1 user user 1073 4月 30 11:05 R2-Apr-30-15-05-12.392-14

BFDで高速切替

通常,ダイナミックルーティングを利用して経路の切り替わりを制御する場合,タイマーの値を調整して行いますが,せいぜい秒単位での切り替わりが限界です.

BFD(Bidirectional Forwarding Detection)(双方向転送検出)を使うとmsec単位での高速な経路切り替えが可能になるということで,検証.

https://tools.ietf.org/html/rfc5880

BDFには2つのモードがある.
ひとつはAsynchronous mode.
定期的にBFDコントロールパケットを送出し,対向側で受信されなくなったら,セッションダウンとなる.(対向側でダウンと検知する)
二つ目はDemand mode.
このモードは一度BFDセッションが確立されると,対向へのBFDコントロールパケットの送出を止める.

検証で使ったIOSではDemandモードの設定はなさそうだった.なので,Asynchorous Modeで動く.

設定は動かすだけなら凄く簡単.

1.インタフェースにBFDの定義を入れる
2.BFDを適用させるルーティングプロトコルへ設定する

以上の2ステップ.

簡単な構成を組んで動かす.

まずは普通にBGPでルーティングの設定.
テスト環境ではkeepalive 5, holddown 15とした.

R1抜粋

router bgp 64512
bgp log-neighbor-changes
network 10.10.10.0 mask 255.255.255.0
network 192.168.1.0
timers bgp 5 15
neighbor 10.10.10.2 remote-as 64513
neighbor 192.168.1.3 remote-as 64512
neighbor 192.168.1.3 next-hop-self
!

R2抜粋

router bgp 64512
bgp log-neighbor-changes
network 10.10.20.0 mask 255.255.255.0
network 192.168.1.0 route-map ATTACH_MED
timers bgp 5 15
neighbor 10.10.20.2 remote-as 64513
neighbor 192.168.1.2 remote-as 64512
neighbor 192.168.1.2 next-hop-self
!
!
ip access-list standard BGP_MED
permit 192.168.1.0 0.0.0.255
!
!
route-map ATTACH_MED permit 10
match ip address BGP_MED
set metric 10
!

R3抜粋

router bgp 64513
bgp log-neighbor-changes
network 10.10.10.0 mask 255.255.255.0
network 192.168.2.0
timers bgp 5 15
neighbor 10.10.10.1 remote-as 64512
neighbor 192.168.2.3 remote-as 64513
neighbor 192.168.2.3 next-hop-self
!

R4抜粋

router bgp 64513
bgp log-neighbor-changes
network 10.10.20.0 mask 255.255.255.0
network 192.168.2.0 route-map ATTACH_MED
timers bgp 5 15
neighbor 10.10.20.1 remote-as 64512
neighbor 192.168.2.2 remote-as 64513
neighbor 192.168.2.2 next-hop-self
!
!
!
ip access-list standard BGP_MED
permit 192.168.2.0 0.0.0.255
!
!
route-map ATTACH_MED permit 10
match ip address BGP_MED
set metric 10
!

それぞれのルーティングテーブルの状態.

R1#show ip route bgp
Codes: L - local, C - connected, S - static, R - RIP, M - mobile, B - BGP
D - EIGRP, EX - EIGRP external, O - OSPF, IA - OSPF inter area
N1 - OSPF NSSA external type 1, N2 - OSPF NSSA external type 2
E1 - OSPF external type 1, E2 - OSPF external type 2
i - IS-IS, su - IS-IS summary, L1 - IS-IS level-1, L2 - IS-IS level-2
ia - IS-IS inter area, * - candidate default, U - per-user static route
o - ODR, P - periodic downloaded static route, H - NHRP, l - LISP
a - application route
+ - replicated route, % - next hop override

Gateway of last resort is not set

10.0.0.0/8 is variably subnetted, 3 subnets, 2 masks
B 10.10.20.0/24 [200/0] via 192.168.1.3, 22:04:03
B 192.168.2.0/24 [20/0] via 10.10.10.2, 22:04:03
R2#show ip route bgp
Codes: L - local, C - connected, S - static, R - RIP, M - mobile, B - BGP
D - EIGRP, EX - EIGRP external, O - OSPF, IA - OSPF inter area
N1 - OSPF NSSA external type 1, N2 - OSPF NSSA external type 2
E1 - OSPF external type 1, E2 - OSPF external type 2
i - IS-IS, su - IS-IS summary, L1 - IS-IS level-1, L2 - IS-IS level-2
ia - IS-IS inter area, * - candidate default, U - per-user static route
o - ODR, P - periodic downloaded static route, H - NHRP, l - LISP
a - application route
+ - replicated route, % - next hop override

Gateway of last resort is not set

10.0.0.0/8 is variably subnetted, 3 subnets, 2 masks
B 10.10.10.0/24 [200/0] via 192.168.1.2, 22:04:10
B 192.168.2.0/24 [200/0] via 192.168.1.2, 22:04:01
R3#show ip route  bgp
Codes: L - local, C - connected, S - static, R - RIP, M - mobile, B - BGP
D - EIGRP, EX - EIGRP external, O - OSPF, IA - OSPF inter area
N1 - OSPF NSSA external type 1, N2 - OSPF NSSA external type 2
E1 - OSPF external type 1, E2 - OSPF external type 2
i - IS-IS, su - IS-IS summary, L1 - IS-IS level-1, L2 - IS-IS level-2
ia - IS-IS inter area, * - candidate default, U - per-user static route
o - ODR, P - periodic downloaded static route, H - NHRP, l - LISP
a - application route
+ - replicated route, % - next hop override

Gateway of last resort is not set

10.0.0.0/8 is variably subnetted, 3 subnets, 2 masks
B 10.10.20.0/24 [200/0] via 192.168.2.3, 22:04:28
B 192.168.1.0/24 [20/0] via 10.10.10.1, 22:04:29
R4#show ip route bgp
Codes: L - local, C - connected, S - static, R - RIP, M - mobile, B - BGP
D - EIGRP, EX - EIGRP external, O - OSPF, IA - OSPF inter area
N1 - OSPF NSSA external type 1, N2 - OSPF NSSA external type 2
E1 - OSPF external type 1, E2 - OSPF external type 2
i - IS-IS, su - IS-IS summary, L1 - IS-IS level-1, L2 - IS-IS level-2
ia - IS-IS inter area, * - candidate default, U - per-user static route
o - ODR, P - periodic downloaded static route, H - NHRP, l - LISP
a - application route
+ - replicated route, % - next hop override

Gateway of last resort is not set

10.0.0.0/8 is variably subnetted, 3 subnets, 2 masks
B 10.10.10.0/24 [200/0] via 192.168.2.2, 22:05:38
B 192.168.1.0/24 [200/0] via 192.168.2.2, 22:05:35

PC1~PC2間でPingを打ち続け,R1とR3のリンクをダウンさせる.

R1#show ip bgp neighbors 10.10.10.2 | inc hold time
Last read 00:00:02, last write 00:00:02, hold time is 15, keepalive interval is 5 seconds
Configured hold time is 15, keepalive interval is 5 seconds

なお,BGPの状態は設定通りに15秒keepaliveが無かったらネイバーをダウンとする設定となっている.
結果を見ると

PC1> ping 192.168.2.10 -t -w 10 -i 1000

84 bytes from 192.168.2.10 icmp_seq=1 ttl=62 time=1.646 ms
84 bytes from 192.168.2.10 icmp_seq=2 ttl=62 time=0.435 ms
84 bytes from 192.168.2.10 icmp_seq=3 ttl=62 time=0.541 ms
192.168.2.10 icmp_seq=4 timeout
192.168.2.10 icmp_seq=5 timeout
192.168.2.10 icmp_seq=6 timeout
192.168.2.10 icmp_seq=7 timeout
192.168.2.10 icmp_seq=8 timeout
192.168.2.10 icmp_seq=9 timeout
192.168.2.10 icmp_seq=10 timeout
192.168.2.10 icmp_seq=11 timeout
192.168.2.10 icmp_seq=12 timeout
192.168.2.10 icmp_seq=13 timeout
192.168.2.10 icmp_seq=14 timeout
192.168.2.10 icmp_seq=15 timeout
84 bytes from 192.168.2.10 icmp_seq=16 ttl=61 time=0.447 ms
84 bytes from 192.168.2.10 icmp_seq=17 ttl=61 time=0.490 ms
84 bytes from 192.168.2.10 icmp_seq=18 ttl=61 time=0.510 ms
84 bytes from 192.168.2.10 icmp_seq=19 ttl=61 time=0.460 ms
^C

およそ15秒程度で疎通が回復している.R1でDebugを有効にして状態を確認すると,

R1#show ip bgp neighbors 10.10.10.2 | inc hold time
Last read 00:00:14, last write 00:00:03, hold time is 15, keepalive interval is 5 seconds
Configured hold time is 15, keepalive interval is 5 seconds
R1#show ip bgp neighbors 10.10.10.2 | inc hold time
Configured hold time is 15, keepalive interval is 5 seconds
R1#show ip bgp neighbors 10.10.10.2 | inc hold time
*Mar 29 07:18:51.950: %BGP-3-NOTIFICATION: sent to neighbor 10.10.10.2 4/0 (hold time expired) 0 bytes
*Mar 29 07:18:51.950: %BGP-5-NBR_RESET: Neighbor 10.10.10.2 reset (BGP Notification sent)
*Mar 29 07:18:51.950: BGP(0): no valid path for 192.168.2.0/24
*Mar 29 07:18:51.950: %BGP-5-ADJCHANGE: neighbor 10.10.10.2 Down BGP Notification sent
*Mar 29 07:18:51.950: %BGP_SESSION-5-ADJCHANGE: neighbor 10.10.10.2 IPv4 Unicast topology base removed from session BGP Notification sent
R1#show ip bgp neighbors 10.10.10.2 | inc hold time
Configured hold time is 15, keepalive interval is 5 seconds
R1#

とちゃんと15秒で切り替わる動きをしている.

ここでBFDの定義を入れる.
Cisco IOSではインタフェース単位やテンプレートを作成してそれを元に画一的な定義を管理することができる.今回はシンプルにインタフェース事に設定する.
BFDの動作に関する主な設定パラメータは以下の通り.

 interval min-tx milliseconds min-rx milliseconds multiplier multiplier-value

「min-tx」で送信間隔,「min-rx」で受信間隔,「multiplier」でダウン検知とするkeepaliveパケットの数を指定する.

R1抜粋

interface Ethernet0/0
ip address 10.10.10.1 255.255.255.0
bfd interval 100 min_rx 100 multiplier 3 #追加
!
interface Ethernet0/1
ip address 192.168.1.2 255.255.255.0
standby 1 ip 192.168.1.1
standby 1 preempt delay minimum 5
bfd interval 100 min_rx 100 multiplier 3 #追加
!
!
!
router bgp 64512
bgp log-neighbor-changes
network 10.10.10.0 mask 255.255.255.0
network 192.168.1.0
timers bgp 5 15
neighbor 10.10.10.2 remote-as 64513
neighbor 10.10.10.2 fall-over bfd #追加
neighbor 192.168.1.3 remote-as 64512
neighbor 192.168.1.3 fall-over bfd #追加
neighbor 192.168.1.3 next-hop-self
!

R2抜粋

interface Ethernet0/0
ip address 10.10.20.1 255.255.255.0
bfd interval 100 min_rx 100 multiplier 3 #追加
!
interface Ethernet0/1
ip address 192.168.1.3 255.255.255.0
standby 1 ip 192.168.1.1
standby 1 priority 10
standby 1 preempt delay minimum 5
bfd interval 100 min_rx 100 multiplier 3 #追加
!
!
!
router bgp 64512
bgp log-neighbor-changes
network 10.10.20.0 mask 255.255.255.0
network 192.168.1.0
timers bgp 5 15
neighbor 10.10.20.2 remote-as 64513
neighbor 10.10.20.2 fall-over bfd #追加
neighbor 10.10.20.2 route-map ATTACH_MED out
neighbor 192.168.1.2 remote-as 64512
neighbor 192.168.1.2 fall-over bfd #追加
!

R3抜粋

interface Ethernet0/0
ip address 10.10.10.2 255.255.255.0
bfd interval 100 min_rx 100 multiplier 3 #追加
!
interface Ethernet0/1
ip address 192.168.2.2 255.255.255.0
standby 1 ip 192.168.2.1
standby 1 preempt delay minimum 3
bfd interval 100 min_rx 100 multiplier 3 #追加
!
!
!
router bgp 64513
bgp log-neighbor-changes
network 10.10.10.0 mask 255.255.255.0
network 192.168.2.0
timers bgp 5 15
neighbor 10.10.10.1 remote-as 64512
neighbor 10.10.10.1 fall-over bfd #追加
neighbor 192.168.2.3 remote-as 64513
neighbor 192.168.2.3 fall-over bfd #追加
neighbor 192.168.2.3 next-hop-self

R4抜粋

interface Ethernet0/0
ip address 10.10.20.2 255.255.255.0
bfd interval 100 min_rx 100 multiplier 3 #追加
!
interface Ethernet0/1
ip address 192.168.2.3 255.255.255.0
standby 1 ip 192.168.2.1
standby 1 priority 10
standby 1 preempt delay minimum 30
bfd interval 100 min_rx 100 multiplier 3 #追加
!
!
!
router bgp 64513
bgp log-neighbor-changes
network 10.10.20.0 mask 255.255.255.0
timers bgp 5 15
neighbor 10.10.20.1 remote-as 64512
neighbor 10.10.20.1 fall-over bfd #追加
neighbor 10.10.20.1 route-map ATTACH_MED out
neighbor 192.168.2.2 remote-as 64513
neighbor 192.168.2.2 fall-over bfd #追加
neighbor 192.168.2.2 next-hop-self

ステータス確認.(R1~R3間)

R1#show bfd neighbors details

IPv4 Sessions
NeighAddr LD/RD RH/RS State Int
10.10.10.2 4/4 Up Up Et0/0
Session state is UP and using echo function with 100 ms interval.
Session Host: Software
OurAddr: 10.10.10.1
Handle: 2
Local Diag: 0, Demand mode: 0, Poll bit: 0
MinTxInt: 1000000, MinRxInt: 1000000, Multiplier: 3
Received MinRxInt: 1000000, Received Multiplier: 3
Holddown (hits): 0(0), Hello (hits): 1000(612)
Rx Count: 617, Rx Interval (ms) min/max/avg: 1/1008/879 last: 681 ms ago
Tx Count: 613, Tx Interval (ms) min/max/avg: 755/1005/884 last: 681 ms ago
Elapsed time watermarks: 0 0 (last: 0)
Registered protocols: BGP
Uptime: 00:09:02
Last packet: Version: 1 - Diagnostic: 0
State bit: Up - Demand bit: 0
Poll bit: 0 - Final bit: 0
C bit: 0
Multiplier: 3 - Length: 24
My Discr.: 4 - Your Discr.: 4
Min tx interval: 1000000 - Min rx interval: 1000000
Min Echo interval: 100000

先ほどと同様にR1~R3間のインタフェースをダウンさせる.

PC1> ping 192.168.2.10 -t -w 10 -i 1000

84 bytes from 192.168.2.10 icmp_seq=1 ttl=62 time=0.480 ms
84 bytes from 192.168.2.10 icmp_seq=2 ttl=62 time=0.391 ms
84 bytes from 192.168.2.10 icmp_seq=3 ttl=62 time=0.478 ms
84 bytes from 192.168.2.10 icmp_seq=4 ttl=62 time=0.501 ms
84 bytes from 192.168.2.10 icmp_seq=5 ttl=62 time=0.414 ms
84 bytes from 192.168.2.10 icmp_seq=6 ttl=62 time=0.366 ms
84 bytes from 192.168.2.10 icmp_seq=7 ttl=62 time=0.412 ms
84 bytes from 192.168.2.10 icmp_seq=8 ttl=62 time=0.527 ms
84 bytes from 192.168.2.10 icmp_seq=9 ttl=62 time=0.439 ms
84 bytes from 192.168.2.10 icmp_seq=10 ttl=62 time=0.380 ms
84 bytes from 192.168.2.10 icmp_seq=11 ttl=62 time=0.499 ms
84 bytes from 192.168.2.10 icmp_seq=12 ttl=62 time=0.442 ms
84 bytes from 192.168.2.10 icmp_seq=13 ttl=62 time=0.420 ms
84 bytes from 192.168.2.10 icmp_seq=14 ttl=62 time=0.506 ms
84 bytes from 192.168.2.10 icmp_seq=15 ttl=62 time=0.495 ms
84 bytes from 192.168.2.10 icmp_seq=16 ttl=62 time=0.424 ms
84 bytes from 192.168.2.10 icmp_seq=17 ttl=62 time=0.445 ms
84 bytes from 192.168.2.10 icmp_seq=18 ttl=61 time=0.423 ms
84 bytes from 192.168.2.10 icmp_seq=19 ttl=61 time=0.653 ms
84 bytes from 192.168.2.10 icmp_seq=20 ttl=61 time=0.518 ms
84 bytes from 192.168.2.10 icmp_seq=21 ttl=61 time=0.677 ms
84 bytes from 192.168.2.10 icmp_seq=22 ttl=61 time=0.714 ms
84 bytes from 192.168.2.10 icmp_seq=23 ttl=61 time=0.690 ms
84 bytes from 192.168.2.10 icmp_seq=24 ttl=61 time=0.832 ms
84 bytes from 192.168.2.10 icmp_seq=25 ttl=61 time=0.741 ms
84 bytes from 192.168.2.10 icmp_seq=26 ttl=61 time=0.743 ms
84 bytes from 192.168.2.10 icmp_seq=27 ttl=61 time=0.693 ms
84 bytes from 192.168.2.10 icmp_seq=28 ttl=61 time=0.673 ms
84 bytes from 192.168.2.10 icmp_seq=29 ttl=61 time=0.630 ms
^C

R1のデバッグログ

R1#
*Mar 29 07:36:15.391: %BGP-5-NBR_RESET: Neighbor 10.10.10.2 reset (BFD adjacency down)
*Mar 29 07:36:15.395: BGP(0): no valid path for 192.168.2.0/24
*Mar 29 07:36:15.395: %BGP-5-ADJCHANGE: neighbor 10.10.10.2 Down BFD adjacency down
*Mar 29 07:36:15.395: %BGP_SESSION-5-ADJCHANGE: neighbor 10.10.10.2 IPv4 Unicast topology base removed from session BFD adjacency down
R1#
*Mar 29 07:36:15.400: BGP: topo global:IPv4 Unicast:base Remove_fwdroute for 192.168.2.0/24
*Mar 29 07:36:15.400: BGP(0): (base) 192.168.1.3 send unreachable (format) 192.168.2.0/24
*Mar 29 07:36:15.400: BGP(0): 192.168.1.3 rcvd UPDATE w/ attr: nexthop 192.168.1.3, origin i, localpref 100, metric 10, merged path 64513, AS_PATH
*Mar 29 07:36:15.400: BGP(0): 192.168.1.3 rcvd 192.168.2.0/24
*Mar 29 07:36:15.400: BGP(0): Revise route installing 1 of 1 routes for 192.168.2.0/24 -> 192.168.1.3(global) to main IP table

msecで切り替わるので,ログからは分からないが,インタフェースが落ちた瞬間にこのログが流れ見た目上もPingのパケロスは発生しなかった.
ちなみにインタフェースの切り戻りにおいてはBFDは効果がなく,BGPのタイマーに従って経路が戻る.これはBFDはルーティングプロトコルありきで動作する補助プロトコルであるためだと思われる.
BGPのネイバーが張られるまではBFDもアップにならない.


R1#show bfd summary

Session Up Down

Total 1 1 0
R1#
*Mar 29 08:08:01.616: %BGP-5-ADJCHANGE: neighbor 10.10.10.2 Up
*Mar 29 08:08:01.617: BGP(0): (base) 10.10.10.2 send UPDATE (format) 192.168.2.0/24, next 10.10.10.1, metric 10, path 64513
*Mar 29 08:08:01.617: BGP(0): (base) 10.10.10.2 send UPDATE (format) 10.10.20.0/24, next 10.10.10.1, metric 0, path Local
*Mar 29 08:08:01.617: BGP(0): (base) 10.10.10.2 send UPDATE (format) 192.168.1.0/24, next 10.10.10.1, metric 0, path Local
*Mar 29 08:08:01.618: BGP(0): 10.10.10.2 rcv UPDATE w/ attr: nexthop 10.10.10.2, origin i, originator 0.0.0.0, merged path 64513 64512, AS_PATH , community , extended community , SSA attribute
*Mar 29 08:08:01.618: BGPSSA ssacount is 0
*Mar 29 08:08:01.618: BGP(0): 10.10.10.2 rcv UPDATE about 192.168.1.0/24 -- DENIED due to: AS-PATH contains our own AS;
*Mar 29 08:08:01.618: BGP(0): 10.10.10.2 rcvd UPDATE w/ attr: nexthop 10.10.10.2, origin i, merged path 64513, AS_PATH
*Mar 29 08:08:01.618: BGP(0): 10.10.10.2 rcvd 10.10.20.0/24
*Mar 29 08:08:01.618: BGP(0): 10.10.10.2 rcvd UPDATE w/ attr: nexthop 10.10.10.2, origin i, metric 0, merged path 64513, AS_PATH
*Mar 29 08:08:01.618: BGP(0): 10.10.10.2 rcvd 10.10.10.0/24
*Mar 29 08:08:01.618: BGP(0): 10.10.10.2 rcvd 192.168.2.0/24
*Mar 29 08:08:01.618: BGP(0): Revise route installing 1 of 1 routes for 192.168.2.0/24 -> 10.10.10.2(global) to main IP table
R1#
*Mar 29 08:08:01.618: BGP(0): 192.168.1.3 NEXT_HOP is set to self for net 192.168.2.0/24,
*Mar 29 08:08:01.618: BGP(0): (base) 192.168.1.3 send UPDATE (format) 192.168.2.0/24, next 192.168.1.2, metric 0, path 64513
*Mar 29 08:08:01.623: BGP(0): 192.168.1.3 rcv UPDATE about 192.168.2.0/24 -- withdrawn
R1#
R1#show bfd summary

Session Up Down

Total 2 2 0
R1#