IPAM: IP Address Management
その名の通りアドレス管理ツールで,以前NetBoxを遣ってみたがアドレス管理だけに焦点をあてると too muchな感じだったので別のものを探していた。
そこでphpipamを見かけたので試した。
結論からいうと,こちらのほうが自分には合っていた。
OpenStackにMiracleLinux9をたて,そこへインストールする。
事前準備
必要要件を確認。正直PHPなど触ったことも無いので良くわからない。
https://phpipam.net/documents/installation/
- Webserver (今回はnginx にした)
- Mysql server (Mariadb)
- PHP
- PHP module
- php PEAR
まず上記含めてインストールに必要なものを準備。
# dnf install https://dl.fedoraproject.org/pub/epel/epel-release-latest-9.noarch.rpm
# dnf install nginx
# dnf install mariadb-server
# dnf install php
# dnf install php-{pdo,pdo_mysql,session,sockets,openssl,gmp,ldap,xml,json,gettext,filter,pcntl,pear,gd}
# dnf install git
# systemctl enable nginx php-fpm mariadb
# systemctl start nginx php-fpm mariadb
phpipamダウンロード。
# git clone  --recursive https://github.com/phpipam/phpipam.git /var/www/phpipam
# cd /var/www/phpipam
# git checkout -b 1.5 origin/1.5
# chown -R nginx:nginx /var/www/
Mariadb初期設定。
# mysql_secure_installation
NOTE: RUNNING ALL PARTS OF THIS SCRIPT IS RECOMMENDED FOR ALL MariaDB
      SERVERS IN PRODUCTION USE!  PLEASE READ EACH STEP CAREFULLY!

In order to log into MariaDB to secure it, we'll need the current
password for the root user. If you've just installed MariaDB, and
haven't set the root password yet, you should just press enter here.

Enter current password for root (enter for none):
OK, successfully used password, moving on...

Setting the root password or using the unix_socket ensures that nobody
can log into the MariaDB root user without the proper authorisation.

You already have your root account protected, so you can safely answer 'n'.

Switch to unix_socket authentication [Y/n] y
Enabled successfully!
Reloading privilege tables..
 ... Success!


You already have your root account protected, so you can safely answer 'n'.

Change the root password? [Y/n] y
New password:
Re-enter new password:
Password updated successfully!
Reloading privilege tables..
 ... Success!


By default, a MariaDB installation has an anonymous user, allowing anyone
to log into MariaDB without having to have a user account created for
them.  This is intended only for testing, and to make the installation
go a bit smoother.  You should remove them before moving into a
production environment.

Remove anonymous users? [Y/n] y
 ... Success!

Normally, root should only be allowed to connect from 'localhost'.  This
ensures that someone cannot guess at the root password from the network.

Disallow root login remotely? [Y/n] y
 ... Success!

By default, MariaDB comes with a database named 'test' that anyone can
access.  This is also intended only for testing, and should be removed
before moving into a production environment.

Remove test database and access to it? [Y/n] y
 - Dropping test database...
 ... Success!
 - Removing privileges on test database...
 ... Success!

Reloading the privilege tables will ensure that all changes made so far
will take effect immediately.

Reload privilege tables now? [Y/n] y
 ... Success!

Cleaning up...

All done!  If you've completed all of the above steps, your MariaDB
installation should now be secure.

Thanks for using MariaDB!
ipam用DBユーザ作成。
# mysql -u root -p
Enter password:
Welcome to the MariaDB monitor.  Commands end with ; or \g.
Your MariaDB connection id is 13
Server version: 10.5.16-MariaDB MariaDB Server

Copyright (c) 2000, 2018, Oracle, MariaDB Corporation Ab and others.

Type 'help;' or '\h' for help. Type '\c' to clear the current input statement.

MariaDB [(none)]> create database phpipam;
Query OK, 1 row affected (0.000 sec)

MariaDB [(none)]> GRANT ALL on phpipam.* to phpipam@localhost identified by 'PASSWORD';
Query OK, 0 rows affected (0.050 sec)

MariaDB [(none)]> exit
Bye
スキーマ取り込み。
# mysql -u root -p phpipam < ./db/SCHEMA.sql設定ファイル編集
設定ファイルをコピー。
# cp /var/www/phpipam/config.dist.php /var/www/phpipam/config.phpDB認証関連パラメータを編集。
# vi /var/www/phpipam/config.php
/**
 * database connection details
 ******************************/
$db['host'] = '127.0.0.1';
$db['user'] = 'phpipam';
$db['pass'] = 'phpipamadmin';
$db['name'] = 'phpipam';
$db['port'] = 3306;


/***
 このままいくと以下メッセージが出るのでPHPのバージョンをサポート外でも起動させるオプションを入れる
Detected PHP version: 8.0.27 >= 8.0
***/

$allow_untested_php_versions=true;
php.iniのタイムゾーンを設定。
# vim /etc/php.ini
[Date]
; Defines the default timezone used by the date functions
; http://php.net/date.timezone
date.timezone = Asia/Tokyo
nginx周りの設定ファイル編集。
/etc/nginx/nginx.conf のサーバセクションをコメントアウト。
# vi /etc/nginx/nginx.conf
#    server {
#        listen       80;
#        listen       [::]:80;
#        server_name  _;
#        root         /usr/share/nginx/html;
#
#        # Load configuration files for the default server block.
#        include /etc/nginx/default.d/*.conf;
#
#        error_page 404 /404.html;
#        location = /404.html {
#        }
#
#        error_page 500 502 503 504 /50x.html;
#        location = /50x.html {
#        }
# }phpipam用に以下設定ファイル作成。公式参照しつつググった結果をもとに適宜修正。
# vi /etc/nginx/conf.d/phpipam.conf
server {
    # root directory
    root   /var/www/phpipam/;

    # phpipam
    location / {
        try_files $uri $uri/ index.php;
        index index.php;
    }
    # phpipam - api
    location /api/ {
        try_files $uri $uri/ /api/index.php;
    }

    # php-fpm
    location ~ \.php$ {
        fastcgi_pass   unix:/var/run/php-fpm/www.sock;
        fastcgi_index  index.php;
        try_files      $uri $uri/ index.php = 404;
        fastcgi_param  SCRIPT_FILENAME $document_root$fastcgi_script_name;
        include        fastcgi_params;
    }
 }
php-fpm.conf のソケットのパスを適切に修正。
# vi /etc/nginx/conf.d/php-fpm.conf
# PHP-FPM FastCGI server
# network or unix domain socket configuration

upstream php-fpm {
        server unix:/var/run/php-fpm/www.sock;
}
アクセス許可
SELinuxとfirewalldでHTTP(80)を許可する。
# firewall-cmd --add-service=http --zone=public --permanent
# firewall-cmd --reload
# sudo setsebool -P httpd_can_network_connect 1
初期設定
これでhttp://ipaddress/ にアクセスすると以下画面が出て初期セットアップに入る。
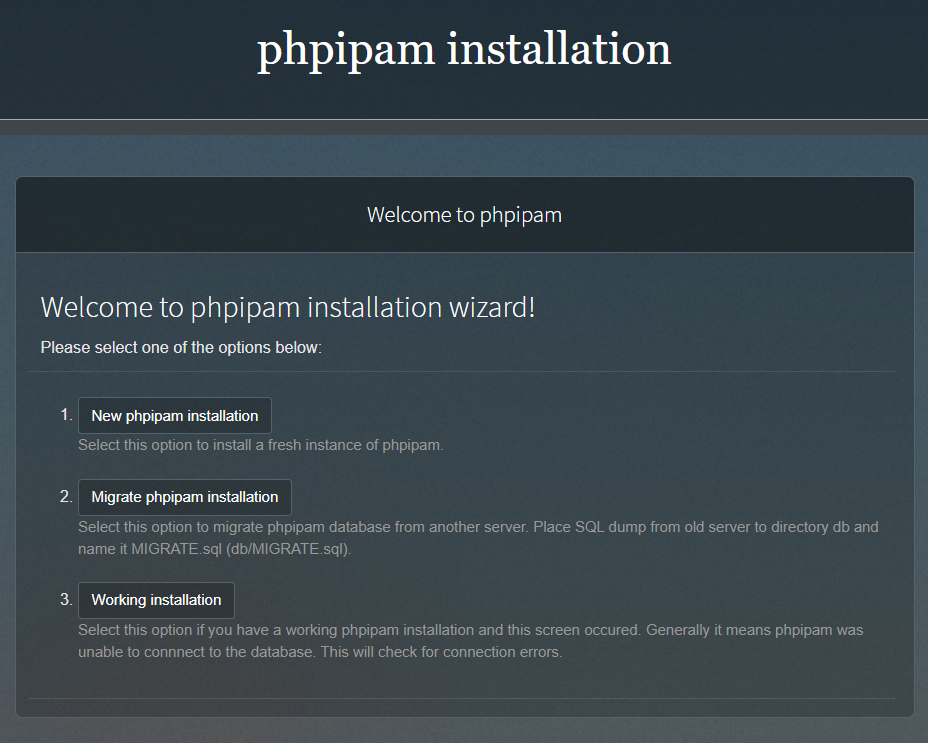
ポチポチやっていくと初期パスでログイン→パス変更→ダッシュボードへと遷移する。
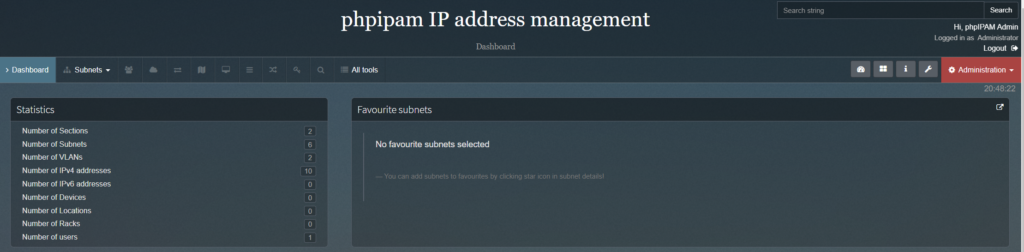
これでセットアップは完了。後はIPアドレス管理のための準備となるが割愛。