phpIPAMインストールメモ

IPAM: IP Address Management

その名の通りアドレス管理ツールで,以前NetBoxを遣ってみたがアドレス管理だけに焦点をあてると too muchな感じだったので別のものを探していた。

そこでphpipamを見かけたので試した。

結論からいうと,こちらのほうが自分には合っていた。

OpenStackにMiracleLinux9をたて,そこへインストールする。

事前準備

必要要件を確認。正直PHPなど触ったことも無いので良くわからない。

https://phpipam.net/documents/installation/

  • Webserver (今回はnginx にした)
  • Mysql server (Mariadb)
  • PHP
  • PHP module
  • php PEAR

まず上記含めてインストールに必要なものを準備。

# dnf install https://dl.fedoraproject.org/pub/epel/epel-release-latest-9.noarch.rpm
# dnf install nginx
# dnf install mariadb-server 
# dnf install php
# dnf install php-{pdo,pdo_mysql,session,sockets,openssl,gmp,ldap,xml,json,gettext,filter,pcntl,pear,gd}
# dnf install git
# systemctl enable nginx php-fpm mariadb
# systemctl start nginx php-fpm mariadb

phpipamダウンロード。

# git clone  --recursive https://github.com/phpipam/phpipam.git /var/www/phpipam
# cd /var/www/phpipam
# git checkout -b 1.5 origin/1.5
# chown -R nginx:nginx /var/www/

Mariadb初期設定。

# mysql_secure_installation
NOTE: RUNNING ALL PARTS OF THIS SCRIPT IS RECOMMENDED FOR ALL MariaDB
      SERVERS IN PRODUCTION USE!  PLEASE READ EACH STEP CAREFULLY!

In order to log into MariaDB to secure it, we'll need the current
password for the root user. If you've just installed MariaDB, and
haven't set the root password yet, you should just press enter here.

Enter current password for root (enter for none):
OK, successfully used password, moving on...

Setting the root password or using the unix_socket ensures that nobody
can log into the MariaDB root user without the proper authorisation.

You already have your root account protected, so you can safely answer 'n'.

Switch to unix_socket authentication [Y/n] y
Enabled successfully!
Reloading privilege tables..
 ... Success!


You already have your root account protected, so you can safely answer 'n'.

Change the root password? [Y/n] y
New password:
Re-enter new password:
Password updated successfully!
Reloading privilege tables..
 ... Success!


By default, a MariaDB installation has an anonymous user, allowing anyone
to log into MariaDB without having to have a user account created for
them.  This is intended only for testing, and to make the installation
go a bit smoother.  You should remove them before moving into a
production environment.

Remove anonymous users? [Y/n] y
 ... Success!

Normally, root should only be allowed to connect from 'localhost'.  This
ensures that someone cannot guess at the root password from the network.

Disallow root login remotely? [Y/n] y
 ... Success!

By default, MariaDB comes with a database named 'test' that anyone can
access.  This is also intended only for testing, and should be removed
before moving into a production environment.

Remove test database and access to it? [Y/n] y
 - Dropping test database...
 ... Success!
 - Removing privileges on test database...
 ... Success!

Reloading the privilege tables will ensure that all changes made so far
will take effect immediately.

Reload privilege tables now? [Y/n] y
 ... Success!

Cleaning up...

All done!  If you've completed all of the above steps, your MariaDB
installation should now be secure.

Thanks for using MariaDB!

ipam用DBユーザ作成。

# mysql -u root -p
Enter password:
Welcome to the MariaDB monitor.  Commands end with ; or \g.
Your MariaDB connection id is 13
Server version: 10.5.16-MariaDB MariaDB Server

Copyright (c) 2000, 2018, Oracle, MariaDB Corporation Ab and others.

Type 'help;' or '\h' for help. Type '\c' to clear the current input statement.

MariaDB [(none)]> create database phpipam;
Query OK, 1 row affected (0.000 sec)

MariaDB [(none)]> GRANT ALL on phpipam.* to phpipam@localhost identified by 'PASSWORD';
Query OK, 0 rows affected (0.050 sec)

MariaDB [(none)]> exit
Bye

スキーマ取り込み。

# mysql -u root -p phpipam < ./db/SCHEMA.sql

設定ファイル編集

設定ファイルをコピー。

# cp /var/www/phpipam/config.dist.php /var/www/phpipam/config.php

DB認証関連パラメータを編集。

# vi /var/www/phpipam/config.php
/**
 * database connection details
 ******************************/
$db['host'] = '127.0.0.1';
$db['user'] = 'phpipam';
$db['pass'] = 'phpipamadmin';
$db['name'] = 'phpipam';
$db['port'] = 3306;


/***
 このままいくと以下メッセージが出るのでPHPのバージョンをサポート外でも起動させるオプションを入れる 
Detected PHP version: 8.0.27 >= 8.0
***/

$allow_untested_php_versions=true;

php.iniのタイムゾーンを設定。

# vim /etc/php.ini
[Date]
; Defines the default timezone used by the date functions
; http://php.net/date.timezone
date.timezone = Asia/Tokyo

nginx周りの設定ファイル編集。

/etc/nginx/nginx.conf のサーバセクションをコメントアウト。

# vi /etc/nginx/nginx.conf
#    server {
#        listen       80;
#        listen       [::]:80;
#        server_name  _;
#        root         /usr/share/nginx/html;
#
#        # Load configuration files for the default server block.
#        include /etc/nginx/default.d/*.conf;
#
#        error_page 404 /404.html;
#        location = /404.html {
#        }
#
#        error_page 500 502 503 504 /50x.html;
#        location = /50x.html {
#        }
#    }

phpipam用に以下設定ファイル作成。公式参照しつつググった結果をもとに適宜修正。

# vi /etc/nginx/conf.d/phpipam.conf
server {
    # root directory
    root   /var/www/phpipam/;
   
    # phpipam
    location / {
        try_files $uri $uri/ index.php;
        index index.php;
    }
    # phpipam - api
    location /api/ {
        try_files $uri $uri/ /api/index.php;
    }

    # php-fpm
    location ~ \.php$ {
        fastcgi_pass   unix:/var/run/php-fpm/www.sock;
        fastcgi_index  index.php;
        try_files      $uri $uri/ index.php = 404;
        fastcgi_param  SCRIPT_FILENAME $document_root$fastcgi_script_name;
        include        fastcgi_params;
    }
 }

php-fpm.conf のソケットのパスを適切に修正。

# vi /etc/nginx/conf.d/php-fpm.conf
# PHP-FPM FastCGI server
# network or unix domain socket configuration

upstream php-fpm {
        server unix:/var/run/php-fpm/www.sock;
}

アクセス許可

SELinuxとfirewalldでHTTP(80)を許可する。

# firewall-cmd --add-service=http --zone=public --permanent
# firewall-cmd --reload
# sudo setsebool -P httpd_can_network_connect 1

初期設定

これでhttp://ipaddress/ にアクセスすると以下画面が出て初期セットアップに入る。

ポチポチやっていくと初期パスでログイン→パス変更→ダッシュボードへと遷移する。

これでセットアップは完了。後はIPアドレス管理のための準備となるが割愛。

NICのTeaming設定(RHEL)

想定構成

以下構成で10GbpsのNICを2本束ねる。

参考URL  nmcli を使用したネットワークチーミングの設定

  1. チーミングインタフェースを作成
  2. 物理IFをチーミングに所属
  3. チーミングIFを有効化

teamingを設定する方法にはいくつかあるが,ここでは公式ドキュメント最初に出てくるnmcliを利用して設定する。なお,teamdは永続性がないためnmcliやifcfgファイルで設定する方がよさそう。

想定する設定は,

  1. interfaceは「enp1s0f0」「enp1s0f1」の2つを利用。
  2. LACP利用
  3. 送信負荷分散のハッシュ値にmac address(scx/dst), ip address(src/dst), tcp port(src/dst) の3つを含める。

Teamingインタフェース作成

nmcliコマンドでTeamingの論理インタフェースを作成する。

# nmcli connection add type team ifname team0 con-name team0 config '{"device": "team0", "runner": {"name": "lacp", "active": true, "fast_rate": true, "tx_hash":  ["eth", "ipv4", "ipv6", "l4"]}, "link_watch": {"name": "ethtool"}}'
接続 'team0' (380df2de-dcef-4436-aded-9c4ab20e13e6) が正常に追加されました。

team0に所属させるインタフェースを設定する。オプションで「con-name」をつけると別名でインタフェースを定義できるが指定しないと「team-slave-enp1s0f0」のようになる。

# nmcli con add type team-slave ifname enp1s0f0 master team0
# nmcli con add type team-slave ifname enp1s0f1 master team0

IFの有効化

物理IF,TeamingIFのどちらを有効にしてもよい。

# nmcli con up team-slave-enp1s0f0
接続が正常にアクティベートされました (D-Bus アクティブパス: /org/freedesktop/NetworkManager/ActiveConnection/22)
# nmcli con up team-slave-enp1s0f1
接続が正常にアクティベートされました (D-Bus アクティブパス: /org/freedesktop/NetworkManager/ActiveConnection/25)

# nmclie con up team0
# ip link
18: team0: <NO-CARRIER,BROADCAST,MULTICAST,UP> mtu 1500 qdisc noqueue state DOWN mode DEFAULT group default qlen 1000
    link/ether 00:1b:21:6e:82:1d brd ff:ff:ff:ff:ff:ff

IPアドレスが設定されないとUPにならないが,後々内部ブリッジに接続させる予定なので今回はここまで。

cronの期間指定

cronの書き方で毎度悩む期間指定。めったに触らないから調べても忘れる。

ということでメモ。

基本的な記述は,「分,時,日,月,曜日」の5つのフィールドに指定したい値を書く。

cron(8) examines cron entries every minute.

The time and date fields are:

    field          allowed values
     -----          --------------
     minute         0-59
     hour           0-23
     day of month   1-31
     month          1-12 (or names, see below)
     day of week    0-7 (0 or 7 is Sunday, or use names)

毎時,毎月などは スラッシュで指定する。例えば「2時間毎に」としたいならば

* */2 * * * 

とする。それは分かる。だがしかし,これは何処を起点に2時間をカウントしはじめるのだろう,設定した時間からカウント始めるのか?それとも0時0分をスタートとして0,2,4,6,8,10,12,・・・としていくのだろうか?と毎度分からなくなる(忘れる)。ソースコードを読み解けば分かるのかもしれないが,そんな技量はないので実際に設定して確認する。

*/3 * * * * date >> /home/user/check

このときの実行状況は以下の通り。

2021年  3月 13日 土曜日 10:18:01 JST
2021年  3月 13日 土曜日 10:21:01 JST
2021年  3月 13日 土曜日 10:24:01 JST
2021年  3月 13日 土曜日 10:27:01 JST
2021年  3月 13日 土曜日 10:30:01 JST
2021年  3月 13日 土曜日 10:33:01 JST
2021年  3月 13日 土曜日 10:36:01 JST
2021年  3月 13日 土曜日 10:39:01 JST

0分からカウントされているっぽい。では41分に4分間隔に変更するとどうだろう。

*/4 * * * * date >> /home/user/check

41分からカウント開始とするなら45分に実行されるはずだが,0分スタートとするならば,44分に実行されるはず。

2021年  3月 13日 土曜日 10:39:01 JST
2021年  3月 13日 土曜日 10:44:01 JST

44分。デスヨネ。なんとなく気づいていましたよ。everyや毎にという言葉が悪い(違。

ただ,そうすると「50分毎に」や「9ヶ月毎に」など時刻ベースではなく純粋に時間間隔で実行したいときはどうするのだろう。

50 * * * *

とすると,0時50分,1時50分,2時50分と毎時50分になる。cronではそういうことは想定していないのだろうな。そもそもマニュアルに“run this command at this time on this date”ってあるしね・・・。個別にスクリプトを書くしかないのか。

LinuxでPBR

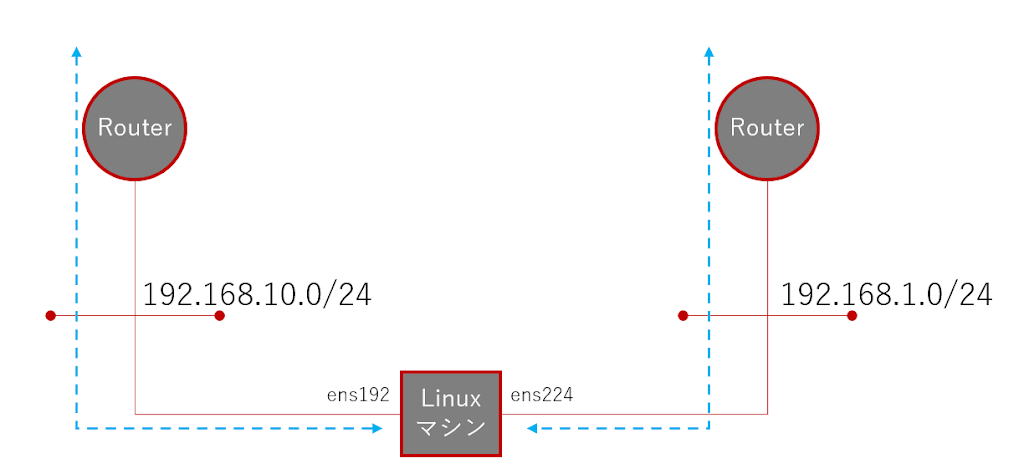
AWSでインスタンスを立ち上げたとき,2つのサブネットに所属させ一方は社内ネットワーク,一方はメンテナンス用に外部(インターネット)からSSHアクセス用にと構成することがある。

この場合,それぞれのNICに着信したトラフィックはそのNICから応答を返して欲しいが通信元が不特定だとスタティックルートで処理するのは不可能。このような時はPBRを設定して対応する。
参考) 

手順

  • ルートテーブルの作成
  • ポリシーの作成
  • ルーティングの追加
  • 永続的設定

ルートテーブルの作成

/etc/iproute2/rt_tables にens192用のルーティングテーブル「rt10」とens224用のルーティングテーブル「rt100」を追加する。なお,IDは1~255まであり,254はmainテーブル,255はlocalでリザーブされている。ここでは100と101を使用する。
#
# reserved values
#
255 local
254 main
253 default
0 unspec
#
# local
#
#1 inr.ruhep
100 rt100 #追加
101 rt10 #追加

ポリシーの作成

書式: ip rule add from <IF address> table <table name> priority <priority number>
# ip rule add from 192.168.10.40 table rt10 priority 100
# ip rule add from 192.168.1.40 table rt100 priority 101

prioritを指定しないとカーネルが一番古いpriorityの前に自動で採番する。何も設定されていなければmainの32766の前に順に追加される。(32765,32764という感じで)

ルーティングの追加

書式: ip route add default via <Gateway address> dev <IF name> table <table name> 
# ip route add default via 192.168.10.1 dev ens192 table rt10
# ip route add default via 192.168.1.1 dev ens224 table rt100
まずはこれでPBRは設定完了。
192.168.1.0/24にいるPCからpingのテスト。
PBR設定前はens192からreplyが返っていない。(なお,リバースパスフィルタリングが有効になっているのでens224では戻りのパケットがかえらない)
PBR設定後はしっかり着信IFからreplyが返っている。

永続的設定

コマンドで設定したルールとルートは再起動で消えるため,/etc/sysconfig/network-script配下に定義ファイルを作成するとあったが,NetworkMangerを利用している環境では利用できない。

・ ルール定義

/etc/sysconfig/network-script/rule-<IF名>
各IFに先のコマンドを記述。
ip rule add from 192.168.10.40 table rt10 priority 100
ip rule add from 192.168.1.40 table rt100 priority 101

・ ルート定義

/etc/sysconfig/network-script/route-<IF名>
各IFに先のコマンドを記述。
ip route add default via 192.168.10.1 dev ens192 table rt10
ip route add default via 192.168.1.1 dev ens224 table rt100
これがNGとなると,起動スクリプトに上のコマンドを実行するように仕込む方法が考えられる。
pbr.sh
#!/bin/sh
## create rules for pbr

ip rule add from 192.168.10.40 table rt10 priority 100
ip rule add from 192.168.1.40 table rt100 priority 101

## create default route for each routing tables
ip route add default via 192.168.10.1 dev ens192 table rt10
ip route add default via 192.168.1.1 dev ens224 table rt100
/etc/systemd/system/pbr.service
[Unit]
Description = PBR setting script
After = network-online.target # NICがオンラインにならないとコマンドが失敗に終わるため

[Service]
ExecStart = /root/pbr.sh
Type = simple

[Install]
WantedBy = multi-user.target

ここまで準備できたら
# systemctl enable pbr.service
# systemctl start pbr.service
で完了。
ただここまでやっておきながら,nmcliを使えばコマンド1行で終わることが分かった。

nmcliを使う方法

ens192の設定
nmcli con add type ethernet con-name ens192 ifname ens192 ipv4.method manual ipv4.addresses 192.168.10.40/24 ipv4.routes "0.0.0.0/1 192.168.10.1 table=100, 128.0.0.0/1 192.168.10.1 table=100" ipv4.routing-rules "priority 100 from 192.168.10.40 table 100"
ens224の設定
nmcli con add type ethernet con-name ens224 ifname ens224 ipv4.method manual ipv4.addresses 192.168.1.40/24 ipv4.routes "0.0.0.0/1 192.168.1.1 table=101, 128.0.0.0/1 192.168.1.1 table=101" ipv4.routing-rules "priority 101 from 192.168.1.40 table 101"
以上。超簡単。再起動後もこれで対応している。
RHELの公式ドキュメントによると,nmcliは0.0.0.0/0の表記に対応していないとのことで,0.0.0.0/1と128.0.0.0/1の2つ定義を入れて0.0.0.0/0をカバーしなくてはならないとのこと。この点とテーブルを名前指定ができず番号で記述する必要があるのがややわかりにくい。
ちなみにIFの設定ファイルは以下にある。
/etc/NetworkManager/system-connections/ens192.nmconnection 
/etc/NetworkManager/system-connections/ens224.nmconnection 

ubuntu@WSL でSSH接続でエラーが出る

NW機器へのSSH接続時に暗号化ネゴの失敗でつながらないときの対処法。

ubuntu:~$ ssh -l cisco 192.168.1.200
Unable to negotiate with 192.168.1.200 port 22: no matching cipher found. Their offer: aes128-cbc,3des-cbc,aes192-cbc,aes256-cbc

暗号化方式チェック。

ubuntu:~$ ssh -Q cipher
3des-cbc
aes128-cbc
aes192-cbc
aes256-cbc
rijndael-cbc@lysator.liu.se
aes128-ctr
aes192-ctr
aes256-ctr
aes128-gcm@openssh.com
aes256-gcm@openssh.com
chacha20-poly1305@openssh.com

サポートはしている。有効化されていないのか。
ちなみにオプション -c で暗号化指定すると行ける。

Cisco側では以下メッセージが出ていた。

 client chacha20-poly1305@openssh.com,aes128-ctr,aes192-ctr,aes256-ctr,aes128-gcm@openssh.com,aes256-gcm@openssh.com 
server aes128-cbc,3des-cbc,aes192-cbc,aes256-cbc

やはりクライアントのオファーにcbcが入っていない・・・。

/etc/ssh/ssh_config を編集。

Host *
# ForwardAgent no
# ForwardX11 no
# ForwardX11Trusted yes
# PasswordAuthentication yes
# HostbasedAuthentication no
# GSSAPIAuthentication no
# GSSAPIDelegateCredentials no
# GSSAPIKeyExchange no
# GSSAPITrustDNS no
# BatchMode no
# CheckHostIP yes
# AddressFamily any
# ConnectTimeout 0
# StrictHostKeyChecking ask
# IdentityFile ~/.ssh/id_rsa
# IdentityFile ~/.ssh/id_dsa
# IdentityFile ~/.ssh/id_ecdsa
# IdentityFile ~/.ssh/id_ed25519
# Port 22
# Protocol 2
# Ciphers aes128-ctr,aes192-ctr,aes256-ctr,aes128-cbc,3des-cbc
Ciphers aes128-ctr,aes192-ctr,aes256-ctr,aes128-cbc # ここを追記
# MACs hmac-md5,hmac-sha1,umac-64@openssh.com
# EscapeChar ~
# Tunnel no
# TunnelDevice any:any
# PermitLocalCommand no
# VisualHostKey no
# ProxyCommand ssh -q -W %h:%p gateway.example.com
# RekeyLimit 1G 1h
SendEnv LANG LC_*
HashKnownHosts yes
GSSAPIAuthentication yes

確認。

ubuntu:~$ ssh -l cisco 192.168.1.200

Password:

これでいけるようになったけど, デフォルトで有効化されているものを確認するにはどうしたらいいのだ。

OpenSSHのリリースノート見たら, 7.5からCBCはデフォルトで無効化されていた。
ubuntuのapt-get upgrade で上げたからかな?

expectコマンドでteraterm macroのようなことをする

Win10にWSLのUbuntu 18.0.4入れ, bashからシリアルコンソールに接続することができた。
Linux OSでシリアルコンソール接続
次は一連のコマンド処理をスクリプトで自動化させる。

「expect」 コマンドでスクリプトを書いていく。
前提条件は
ー Cisco機器はユーザ名/パスワード等基本設定は完了済み
ー シリアルポートは /dev/ttyS2 を利用
ー 接続コマンドは cu コマンドを利用

#!/bin/sh

expect -c "
set timeout 10 # タイムアウト設定:10秒
spawn cu -l /dev/ttyS2 # 実行コマンド記述
sleep 2 # 2秒待ちを入れる。これを入れないとうまくコンソールが開始しない
send "n" # EnterキーでCiscoのターミナルを表示させる
expect "Username:" # ユーザ名入力メッセージ待ち
send "usernamen" # ユーザ名を入力
expect "Password:" # パスワード入力メッセージ待ち
send "passwordn" # パスワードを入力
expect ">" # プロンプト待ち
send "enn" # enableコマンド入力
expect "Password:" # パスワード入力メッセージ待ち
send "enablen" # enableパスワード入力
expect "#" # 特権モードプロンプト待ち
send "term leng 0 n" # 処理1 (今回は terminal length 0)
expect "#" # 特権モードプロンプト待ち
send "show run n" # 処理2 (今回は show run)
expect "#" # 特権モードプロンプト待ち
send "exit n" # 処理終了
expect "Press RETURN to get started." # ログアウトメッセージ待ち
exit 0 # スクリプト終了
"

このスクリプトでshow running-configを出力することができる。
# screenコマンドでやる場合はroot権限が必要なのでスクリプトを実行するときはsudo でやる。
teraterm macro でやることとほぼ同じことをスクリプトでやっているだけだけれど, これができると次にやっとAnsibleを絡めたコンソール経由での処理自動化に進める。

Linux OSでシリアルコンソール接続

Windows10にWSLが実装され, Ubuntuが利用できるようになったのでbashをつかったルータ等にシリアルコンソールで接続するにはどうしたらよいのか調べたところ, すごく簡単だった。

Windows上でコンソールポートが「Com1」だった場合,

$ sudo screen /dev/ttyS1

で接続できる。Comポートの番号とttySXの「X」が紐ついている。

Ctrl-A -> k

でターミナル終了。デフォルトで9600になっているからオプションなくて大丈夫なはず。

なお, screenは標準でインストールされているが, MSのページではcu コマンドで紹介している。
Serial Support on the Windows Subsystem for Linux

cu コマンドでやる場合は, ターミナル設定のFlow controlを無効にしないと反応が返ってこない。
/etc/uucp/port を新規作成する。

port      ttyS2       # Port name
type direct # Direct connection to other system
device /dev/ttyS2 # Port device node
hardflow false # No hardware flow control
speed 9600 # Line speedつd

/dev/ttyS1 のアクセス権がroot/dialout となっている。ユーザをdialoutグループに参加させる必要がる。

$ sudo gpasswd ubuntu dialout

上記設定後に

$ cu -l /dev/ttyS1

で接続できる。終了するときは「~.」。

【メモ】CentOSにVirtualboxをインストールする

ESXにvCenterを入れたいのだけれども、今あるESXではメモリが足りないという事情があり、OpenStack上にCentOS7を立ててその中にVirtualBoxをインストールして、さらにその中にESXを動かそうという試み。

まぁ、ESXi over VirtualBox over KVM というまともに動くとは思えないことをやろうとしているのだけれども、手持ちの資源でやむなく(そしてとりあえず)やるだけやってみる。
その準備として、CentOS7にVirtualBoxを入れる。
オフィシャルに入れ方があるのでそのままやる。
<手順>
  1. virtualboxのリポジトリ登録
  2. kernel-devel インストール
  3. gcc / make インストール
  4. virtualbox インストール
  5. KERN_DIR の環境変数を設定
  6. OS再起動
  7. kernelのリビルド
こんな流れ。
– 1.
[virtualbox]
name=Oracle Linux / RHEL / CentOS-$releasever / $basearch - VirtualBox
baseurl=http://download.virtualbox.org/virtualbox/rpm/el/$releasever/$basearch
enabled=1
gpgcheck=1
repo_gpgcheck=1
gpgkey=https://www.virtualbox.org/download/oracle_vbox.asc
– 2.
yum install kernel-devel-3.10.0-327.28.3.el7.x86_64
yum update

– 3.

yum install gcc make

– 4.

yum install VirtualBox-5.1.x86_64

– 5.

export KERN_DIR=/usr/src/kernels/3.10.0-514.26.2.el7.x86_64

– 6.

reboot

– 7.

/usr/lib/virtualbox/vboxdrv.sh setup

以上。

あとはvirtualboxコマンドで無事起動。

さて, ここからが問題だ・・・。

【メモ】sshdの暗号化設定を変える

sshdの設定をSHA1をオフにすることが目的。

この辺を参考にした。

/etc/ssh/sshd_config を編集。
# 暗号強度指定
Ciphers aes256-ctr,aes192-ctr,arcfour256
# sha-1 除外
MACs hmac-sha2-256,hmac-sha2-512,hmac-sha2-256-etm@openssh.com,hmac-sha2-512-etm@openssh.com

確認。

# sshd -T | grep macs
macs hmac-sha2-256,hmac-sha2-512,hmac-sha2-256-etm@openssh.com,hmac-sha2-512-etm@openssh.com
# sshd -T | grep cip
ciphers aes256-ctr,aes192-ctr,arcfour256

【OpenStack】CentOS7でファイルサーバ立てたけどやたらとスループットが悪い

使っていたNASの容量がもうパンパンだったので,大量にDisk詰んだRDOにCentOS7をたててファイルサーバとしてNAS代わりにした。

が,やったらと速度が出ない。
ファイル移行で8Mbps程度しか出ていない。

で,「Neutron 速度がでない」とかでぐぐってみると,大体同じ事象がたくさん出てくる。

NICにトラフィック処理をオフロードしていることが原因のようで。

ここらを参考にGROをOFFにした。

・ Slow network speed between VM and external
・ NICのオフロード機能を無効にする

    $ ethtool -k enp4s0
    Features for enp4s0:
    rx-checksumming: on
    tx-checksumming: off
            tx-checksum-ipv4: off
            tx-checksum-ip-generic: off [fixed]
            tx-checksum-ipv6: off
            tx-checksum-fcoe-crc: off [fixed]
            tx-checksum-sctp: off [fixed]
    scatter-gather: off
            tx-scatter-gather: off
            tx-scatter-gather-fraglist: off [fixed]
    tcp-segmentation-offload: off
            tx-tcp-segmentation: off
            tx-tcp-ecn-segmentation: off [fixed]
            tx-tcp6-segmentation: off
    udp-fragmentation-offload: off [fixed]
    generic-segmentation-offload: off [requested on]
    generic-receive-offload: on
    large-receive-offload: off [fixed]
    rx-vlan-offload: on
    tx-vlan-offload: on
    ntuple-filters: off [fixed]
    receive-hashing: off [fixed]
    highdma: off [fixed]
    rx-vlan-filter: off [fixed]
    vlan-challenged: off [fixed]
    tx-lockless: off [fixed]
    netns-local: off [fixed]
    tx-gso-robust: off [fixed]
    tx-fcoe-segmentation: off [fixed]
    tx-gre-segmentation: off [fixed]
    tx-ipip-segmentation: off [fixed]
    tx-sit-segmentation: off [fixed]
    tx-udp_tnl-segmentation: off [fixed]
    fcoe-mtu: off [fixed]
    tx-nocache-copy: off
    loopback: off [fixed]
    rx-fcs: off
    rx-all: off
    tx-vlan-stag-hw-insert: off [fixed]
    rx-vlan-stag-hw-parse: off [fixed]
    rx-vlan-stag-filter: off [fixed]
    l2-fwd-offload: off [fixed]
    busy-poll: off [fixed]

    $ sudo ethtool -K enp4s0 gro off
    $ ethtool -k enp4s0
    Features for enp4s0:
    rx-checksumming: on
    tx-checksumming: off
            tx-checksum-ipv4: off
            tx-checksum-ip-generic: off [fixed]
            tx-checksum-ipv6: off
            tx-checksum-fcoe-crc: off [fixed]
            tx-checksum-sctp: off [fixed]
    scatter-gather: off
            tx-scatter-gather: off
            tx-scatter-gather-fraglist: off [fixed]
    tcp-segmentation-offload: off
            tx-tcp-segmentation: off
            tx-tcp-ecn-segmentation: off [fixed]
            tx-tcp6-segmentation: off
    udp-fragmentation-offload: off [fixed]
    generic-segmentation-offload: off [requested on]

    generic-receive-offload: off   # OFFになった

    これで転送やりなおしたら200Mbpsくらいまで改善された。100Mbpsでした。
    しかし,これって再起動したらまた戻るんだっけか?

    rcスクリプトとかにethtoolを仕込んでおかないとダメっぽい。

    Turning off GRO on startup
    ・ How to persist ethtool settings through reboot

    # /etc/sysconfig/network-scripts/ifcfg-enp4s0
    ETHTOOL_OPTS=”gro off”

    これでどうかしら。