VLAN Trunkポートのキャプチャ

Trunkポートを流れるパケットのVLANタグをWiresharkでキャプチャしたい。と思ったときに思いのほか手順が多かったのでメモとして残す。

ざっくり手順

上記構成でパケットキャプチャの手順は次の通り。

  1. SW1にてキャプチャの設定
  2. キャプチャを行うPCで802.1qのタグを落とさないよう,キャプチャを取得するNICのドライバ設定
  3. Wiresharkで802.1qのタグをキャプチャ画面の列に表示するよう設定

通常のアクセスポートでキャプチャを行うだけであれば意識することなくできると思うが,VLAN Trunkポートにおいては各手順でいつもと違う設定が必要になる。

SW1でmonitor session 設定

通常のキャプチャであれば

monitor session 1 source interface Gi0/1
monitor session 1 destination interface Gi0/2

とシンプルに設定をすればよいが,デフォルトではタグ情報を外して宛先ポートへパケットが転送されるため「encapsulation」オプションで「replicate / dot1q」を指定する必要がある。カプセル化でISLを設定するケースはまず無いと思うので,このオプションはdot1qでTrunk設定しているならばどちらでも良いと思う。オプションの違いは,送信元IFと同じカプセル化・設定を指定する場合は「replicate」,dot1qの設定とするならば「dot1q」という感じ。(※ IOSの場合)

なお,受信パケットでにおいて特定のVLANを限定して取得したい場合は「ingress dot1q vlan」オプションでVLAN IDを指定する。

(任意)宛先インターフェイスで IEEE 802.1Q カプセル化方式の使用を指定するには、 encapsulation dot1q を入力します。
(任意)送信元インターフェイスのカプセル化方式が宛先インターフェイスで複製されるように指定するには、 encapsulation replicate を入力します。これを選択しない場合、デフォルトでは、パケットがネイティブ形式(タグなし)で送信されます。
宛先ポートでの着信トラフィックの転送をイネーブルにして、カプセル化タイプを指定するには、 ingress をキーワードと一緒に入力します。
– dot1q vlan vlan-id: デフォルトの VLAN として指定した VLAN で、IEEE 802.1Q でカプセル化された着信パケットを受信します。
– untagged vlan vlan-id または vlan vlan-id: デフォルトの VLAN として指定した VLAN で、タグなしでカプセル化された着信パケットを受信します。

cisco.com/c/ja_jp/td/docs/sw/lanswt-access/cat2960swt/cg/005/swcfg/swspan.html

よって次のような設定を入れる。

monitor session 1 source interface Gi0/1
monitor session 1 destination interface Gi0/2 encapsulation replicate  # dot1q でもOK

NICの設定

およそのNICはデフォルトでVLANタグを落とす設定になっているため,NICの詳細設定で「Packet Priority&VLAN」を「Disable」にする。※デフォルトでは「Enable」になっているはず

この設定ができない(VLANタグをそのまま受信できない)NICもあるようで,NICの対応状況は予めチェックが必要。今回利用したNICはStarTechのUSBタイプ。

Wiresharkの設定

Wiresharkのキャプチャ画面の項目(列)にはVLAN情報がデフォルトでは表示されないため,VLAN IDを表示させるため外観設定を変更する。パケットを選択すればVLANフィールドがあるので別に要らないという人はここはやらなくてもOK。ただぱっと見どのVLANか分かるので可視性はよい。

Wiresharkを立ち上げ,「編集」→「設定」で設定画面表示。

「+」ボタンを押してフィールドを追加し,フィールドに「vlan.id」を入力する。題名はお好きなように。ここでは「VLAN」とした。

これで準備完了。

キャプチャする

VLANが表示されて幸せになれる。

ちなみに,QinQを表示させたい場合は,Wiresharkで追加するフィールドに「ieee8021ad.id1」を入力する。

  1. Display Filter Reference: IEEE 802.1ad (https://www.wireshark.org/docs/dfref/i/ieee8021ad.html ↩︎

PPPoE LAN型払い出し設定

よくあるフレッツ系回線収容するときにPPPoE IP8で契約してルータなりFWなりで受ける構成を組むときのメモ。IOSはそれなりにやっているから良いとして,SRXやFortigateで最近構築することがあるのでメモを残す。

LAN払い出し型の場合,ルータ単体では実装は難しい(というか無理)なようで別途RADIUSサーバを準備する必要がある。(TACACS+でもいけるかなと思ったが,RAIDUSの「Framed-IP-Address/Framed-IP-Netmask」に該当するものが見当たらなかったので素直にFreeradiusをDebianに入れることにした。)

FreeRADIUS準備

Debian10にfreeradiusを入れる。公式を見ると4.0はめちゃくちゃ面倒だからただ使いなら3.xつかえとあったのでそれに従う。

参考) https://networkradius.com/packages/#fr32-debian-buster

# apt install freeradius -y

結構時間がかかるけれど,これで完了。次にclient.confの編集。

# vi /etc/freeradius/3.0/client.conf
# 以下追加
client 192.168.1.3 {                         # PPPoEサーバのIPアドレス
        secret = secret-key                  # 認証用Key
}

続いてPPP認証用のユーザ設定。

# vi /etc/freeradius/3.0/user
# 以下追加
radius-user Cleartext-Password := "rad-secret"
        Service-Type = Framed-User,
        Framed-Protocol = PPP,
        Framed-IP-Address = 10.10.10.1,
        Framed-IP-Netmask = 255.255.255.248

RADIUS再起動。

# systemctl restart freeradius

PPPoEサーバ準備

次にIOS XE17系でPPPoEサーバの準備。(以下抜粋)

radius server FreeRadius
 address ipv4 <radiusのIP> auth-port 1812 acct-port 1813
 key secret-key
!
aaa new-model
!
!
aaa group server radius PPPoE
 server name FreeRadius
 ip radius source-interface GigabitEthernet0/4
!

aaa authentication ppp default group PPPoE
aaa authorization network default group PPPoE
aaa accounting network default start-stop group PPPoE
!

bba-group pppoe FLETS
 virtual-template 1
!
interface Loopback1
 ip address 172.17.1.1 255.255.255.0
!
interface GigabitEthernet1                   # RADIUSサーバと通信するIF
 ip address 192.168.1.3 255.255.255.0
 duplex auto
 speed auto
!
interface GigabitEthernet3                   # PPPoE接続用IF
 no ip address
 duplex auto
 speed auto
 pppoe enable group FLETS
!
interface Virtual-Template1
 mtu 1454
 ip unnumbered Loopback1
 ppp authentication chap
!

PPPoEクライアント設定

IOS 15.x系

interface GigabitEthernet0/0
 no ip address
 pppoe enable group global
 pppoe-client dial-pool-number 1
!
interface GigabitEthernet0/1
 ip address 10.10.10.1 255.255.255.248
!
interface Dialer0
 ip unnumbered GigabitEthernet0/1
 encapsulation ppp
 dialer pool 1
 dialer-group 1
 ppp authentication chap callin
 ppp chap hostname radius-user
 ppp chap password 0 rad-secret
!
ip route 0.0.0.0 0.0.0.0 Dialer0
!
dialer-list 1 protocol ip permit

JUNOS

このまんま。

set interfaces ge-0/0/0 unit 0 encapsulation ppp-over-ether
set interfaces ge-0/0/1 unit 0 family inet address 10.10.10.1/29
set interfaces fxp0 unit 0
set interfaces pp0 unit 1 ppp-options chap default-chap-secret "$9$eZBMxdbwgZGiN-kP5Q9CuO1Ervx7V2oG"
set interfaces pp0 unit 1 ppp-options chap local-name radius-user
set interfaces pp0 unit 1 ppp-options chap passive
set interfaces pp0 unit 1 pppoe-options underlying-interface ge-0/0/0.0
set interfaces pp0 unit 1 pppoe-options auto-reconnect 10
set interfaces pp0 unit 1 pppoe-options client
set interfaces pp0 unit 1 family inet unnumbered-address ge-0/0/1.0
set routing-options static route 0.0.0.0/0 next-hop pp0.1

Fortigate

WANのインタフェースにネットワークアドレス部分を入れないと駄目のようで,設定上気持ちが悪い。(が仕方が無いらしい)

system_interface:
    - wan:
        vdom: "FG-traffic"
        mode: pppoe
        allowaccess: ping
        type: physical
        lldp-reception: disable
        role: wan
        snmp-index: 1
        ipunnumbered: 10.10.10.0
        username: "radius-user"
        pppoe-unnumbered-negotiate: disable
        password: ENC xxxx
    - internal:
        vdom: "FG-traffic"
        ip: 10.10.10.1 255.255.255.248
        allowaccess: ping
        type: hard-switch
        device-identification: enable
        lldp-reception: disable
        lldp-transmission: disable
        role: lan
        snmp-index: 10

なお,PPPoEではないが,この構成でIPSecを行う際に送信元IPの指定がGUIでは「Local ID」しか設定することができず,CLIで「localid-type」を「address」に指定しないとPhase1の認証がこける。ここでハマって1日費やした。

Catalyst3560CでGREトンネル

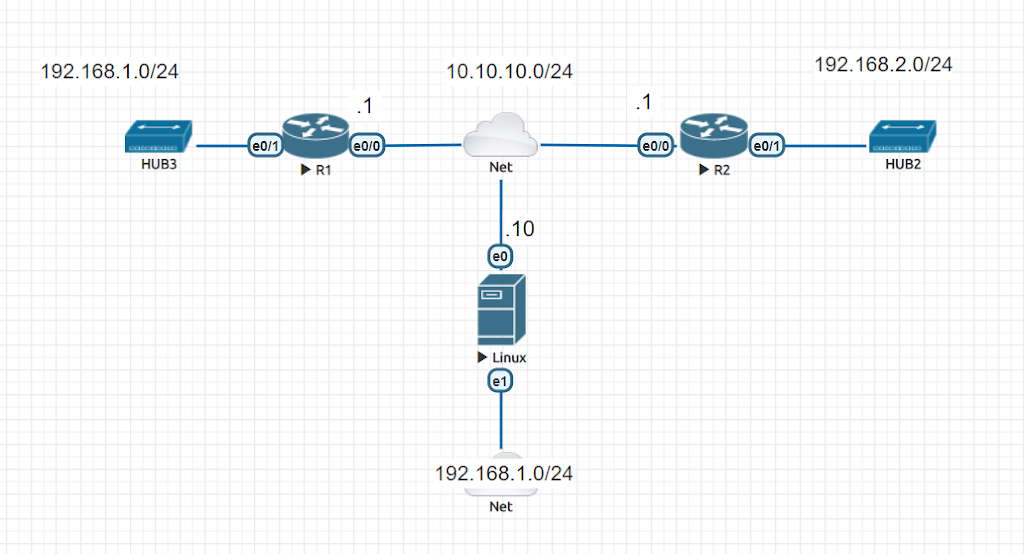
とある検証でL3SWでGREトンネルのみ張る設定を確認した。普通にいけるかなと思ったが,keepaliveでひっかかったのでメモ。

基本的には,Vlan IFにIPアドレスを設定し,tunnel source / destination でそれぞれ指定すれば完了。ただし,Keepaliveを設定するとDownとなる。デバッグをとっても応答が返ってこず(recieveが無い)Down判定されていた。

interface Tunnel1
 ip address 192.168.254.2 255.255.255.252
 keepalive 5 2
 tunnel source Vlan1
 tunnel destination 192.168.10.1

なんでだろうなと調べてみると,以下の一文を見つけた。

Support is available for gre ip tunnel mode. The tunnel source can be loopback and Layer 3 (physical or Etherchannel) interfaces only.

https://www.cisco.com/c/dam/en/us/td/docs/switches/lan/catalyst3850/software/release/16-1/workflows/gre-feature-guide.pdf

なるほど。型番もバージョンも違うけれどこれっぽい。試しにip routingを有効にしてLoopback IFを追加,対向のLoに対するスタティックルート追加したところ無事にkeepalive有りでトンネルが張れた。

枯れた技術だけれど,結構まだハマるところがあるという。精進が足りませんね。

IOSの設定ファイルをFTPサーバへ保存して世代管理する。

Cisco IOSでConfigの世代管理をターミナルソフトでログ出力してローカル保存することから脱却したいと考え,AnsibleやNetconfなども考えたが今の現場では人力設定変更からの脱却がなかなかに難しい。(政治的にも運用的にもスキルセット的にも)

ということで,現行の環境をできるだけそのままに新しい機能では無いけど,「archive」コマンドで少しは幸せになれそうな気がしたので検証。

今回の検証環境はシンプルに,ルータ2台,FTPサーバ1台とする。

FTPサーバ(10.10.10.10)へConfigをアーカイブする

「archive」コマンドはマニュアルでも実行でき,設定しておけば自動で指定した場所へConfigを保存してくれる。デフォルトでは10世代まで保存となっており,maximumオプションで1~14まで指定ができる。

IOSのコンフィギュレーション アーカイブ

図のR1とR2に以下定義を入れる。

! FTPの基本設定
ip ftp source-interface Ethernet0/0
ip ftp username user
ip ftp password Test123

! アーカイブ設定
archive
path ftp://10.10.10.10/$h # $h は機器のホスト名
write-memory # 設定保存時にアーカイブ実行
time-period 3 # アーカイブを実行するタイミングの指定。今回は検証なので3分とした。

設定保存時と定期的にアーカイブをする設定を入れたが,time-periodはアーカイブをしたタイミングを起点に何分後という説明だったので,自動と手動のどちらも見るのか気になり確認をしたところ,archiveを設定した時点から定期的に取得するらしく,「archive config」コマンドで手動で実行したアーカイブは無視されていた。

R1#show archive
The maximum archive configurations allowed is 10.
The next archive file will be named ftp://10.10.10.10/R1--9
Archive # Name
1 ftp://10.10.10.10/R1-Apr-30-14-27-36.582-0
2 ftp://10.10.10.10/R1-Apr-30-14-28-49.035-1 # archiveコマンド設定後,最初の自動アーカイブ
3 ftp://10.10.10.10/R1-Apr-30-14-31-50.160-2 # 初回から3分後,2回目のアーカイブ
4 ftp://10.10.10.10/R1-Apr-30-14-34-51.091-3 # 3回目の自動アーカイブ
5 ftp://10.10.10.10/R1-Apr-30-14-34-59.006-4 # 「archive config」コマンドで手動でアーカイブを実行
6 ftp://10.10.10.10/R1-Apr-30-14-35-09.006-5 # 「archive config」コマンドで手動でアーカイブを実行
7 ftp://10.10.10.10/R1-Apr-30-14-37-52.197-6 # 4回目の自動アーカイブ
8 ftp://10.10.10.10/R1-Apr-30-14-39-17.723-7 # 「archive config」コマンドで手動でアーカイブを実行
9 ftp://10.10.10.10/R1-Apr-30-14-40-53.180-8 < -- Most Recent

この構成にすることでアーカイブと対となるロールバックも可能になる。

例えば,LAN側インタフェースの設定を入れたあと,誤って設定を消してしまった場合,「configure replace」コマンドでロールバックを行うことができる。

R1#show ip
*Apr 30 14:51:51.064: %LINK-3-UPDOWN: Interface Ethernet0/1, changed state to up
*Apr 30 14:51:52.072: %LINEPROTO-5-UPDOWN: Line protocol on Interface Ethernet0/1, changed state to up
R1#show ip int brie
Interface IP-Address OK? Method Status Protocol
Ethernet0/0 10.10.10.1 YES manual up up
Ethernet0/1 192.168.1.1 YES manual up up
Ethernet0/2 unassigned YES unset administratively down down
Ethernet0/3 unassigned YES unset administratively down down
R1#
R1#copy run startup-config
Destination filename [startup-config]?
Building configuration...
[OK]
Writing R1-Apr-30-14-51-57.355-12
R1#
R1#conf t
Enter configuration commands, one per line. End with CNTL/Z.
R1(config)#default interface e0/1 #やっちまった!!!
Interface Ethernet0/1 set to default configuration
R1(config)#do show ip int brie
Interface IP-Address OK? Method Status Protocol
Ethernet0/0 10.10.10.1 YES manual up up
Ethernet0/1 unassigned YES TFTP up up
Ethernet0/2 unassigned YES unset administratively down down
Ethernet0/3 unassigned YES unset administratively down down

手動で簡単に戻せるレベルだが,せっかくアーカイブをとっているので一つ前の設定へロールバックする。

R1#show archive
The maximum archive configurations allowed is 10.
The next archive file will be named ftp://10.10.10.10/R1-<timestamp>-15
Archive # Name
1 ftp://10.10.10.10/R1-Apr-30-14-35-09.006-5
2 ftp://10.10.10.10/R1-Apr-30-14-37-52.197-6
3 ftp://10.10.10.10/R1-Apr-30-14-39-17.723-7
4 ftp://10.10.10.10/R1-Apr-30-14-40-53.180-8
5 ftp://10.10.10.10/R1-Apr-30-14-43-54.061-9
6 ftp://10.10.10.10/R1-Apr-30-14-46-54.980-10
7 ftp://10.10.10.10/R1-Apr-30-14-49-56.023-11
8 ftp://10.10.10.10/R1-Apr-30-14-51-57.355-12
9 ftp://10.10.10.10/R1-Apr-30-14-52-56.856-13
10 ftp://10.10.10.10/R1-Apr-30-14-55-58.039-14 <- Most Recent

一つ前は「ftp://10.10.10.10/R1-Apr-30-14-52-56.856-13」なので,これを指定してロールバックを実行する。

R1#configure replace ftp://10.10.10.10/R1-Apr-30-14-52-56.856-13
This will apply all necessary additions and deletions
to replace the current running configuration with the
contents of the specified configuration file, which is
assumed to be a complete configuration, not a partial
configuration. Enter Y if you are sure you want to proceed. ? [no]: yes
Loading R1-Apr-30-14-52-56.856-13 !
[OK - 1106/4096 bytes]

Loading R1-Apr-30-14-52-56.856-13 !
[OK - 1106/4096 bytes]

Total number of passes: 1
Rollback Done

R1#
*Apr 30 15:00:31.984: Rollback:Acquired Configuration lock.
R1#show ip int brie
Interface IP-Address OK? Method Status Protocol
Ethernet0/0 10.10.10.1 YES manual up up
Ethernet0/1 192.168.1.1 YES TFTP up up
Ethernet0/2 unassigned YES unset administratively down down
Ethernet0/3 unassigned YES unset administratively down down
R1#show arc
R1#show archive
The maximum archive configurations allowed is 10.
The next archive file will be named ftp://10.10.10.10/R1-<timestamp>-16
Archive # Name
1 ftp://10.10.10.10/R1-Apr-30-14-37-52.197-6
2 ftp://10.10.10.10/R1-Apr-30-14-39-17.723-7
3 ftp://10.10.10.10/R1-Apr-30-14-40-53.180-8
4 ftp://10.10.10.10/R1-Apr-30-14-43-54.061-9
5 ftp://10.10.10.10/R1-Apr-30-14-46-54.980-10
6 ftp://10.10.10.10/R1-Apr-30-14-49-56.023-11
7 ftp://10.10.10.10/R1-Apr-30-14-51-57.355-12
8 ftp://10.10.10.10/R1-Apr-30-14-52-56.856-13
9 ftp://10.10.10.10/R1-Apr-30-14-55-58.039-14
10 ftp://10.10.10.10/R1-Apr-30-14-58-59.227-15 <- Most Recent
R1#

無事に設定はもどり,アーカイブ番号は戻るのではなく更新される。

いちいちどの定義を入れ直さなくてはダメなのか,という確認が不要なので便利だと思うし,運用に入った環境では人的ミスの削減にもつながるはず。
ちなみにアーカイブの差分も以下コマンドで確認できる。

R11#$R11-Apr-30-15-25-28.087-24 ftp://10.10.10.10/R1-Apr-30-15-23-03.315-23
Loading R11-Apr-30-15-25-28.087-24 !
[OK - 1106/4096 bytes]

Loading R1-Apr-30-15-23-03.315-23 !
[OK - 1105/4096 bytes]
!Contextual Config Diffs:
+hostname R1
-hostname R11

なお,FTPサーバ側にもちゃんとファイルが保存されている。

[user@localhost ~]$ ls -lrt
合計 128
-rw-r--r--. 1 user user 1093 4月 30 10:27 R1-Apr-30-14-27-36.582-0
-rw-r--r--. 1 user user 1073 4月 30 10:28 R2-Apr-30-14-28-22.973-1
-rw-r--r--. 1 user user 1093 4月 30 10:28 R1-Apr-30-14-28-49.035-1
-rw-r--r--. 1 user user 1073 4月 30 10:29 R2-Apr-30-14-29-06.901-2
-rw-r--r--. 1 user user 1093 4月 30 10:31 R1-Apr-30-14-31-50.160-2
-rw-r--r--. 1 user user 1073 4月 30 10:32 R2-Apr-30-14-32-08.023-3
-rw-r--r--. 1 user user 1093 4月 30 10:34 R1-Apr-30-14-34-51.091-3
-rw-r--r--. 1 user user 1093 4月 30 10:34 R1-Apr-30-14-34-59.006-4
-rw-r--r--. 1 user user 1093 4月 30 10:35 R1-Apr-30-14-35-09.006-5
-rw-r--r--. 1 user user 1073 4月 30 10:35 R2-Apr-30-14-35-08.939-4
-rw-r--r--. 1 user user 1093 4月 30 10:37 R1-Apr-30-14-37-52.197-6
-rw-r--r--. 1 user user 1073 4月 30 10:38 R2-Apr-30-14-38-09.972-5
-rw-r--r--. 1 user user 1093 4月 30 10:39 R1-Apr-30-14-39-17.723-7
-rw-r--r--. 1 user user 1093 4月 30 10:40 R1-Apr-30-14-40-53.180-8
-rw-r--r--. 1 user user 1073 4月 30 10:41 R2-Apr-30-14-41-10.819-6
-rw-r--r--. 1 user user 1093 4月 30 10:43 R1-Apr-30-14-43-54.061-9
-rw-r--r--. 1 user user 1073 4月 30 10:44 R2-Apr-30-14-44-10.959-7
-rw-r--r--. 1 user user 1093 4月 30 10:46 R1-Apr-30-14-46-54.980-10
-rw-r--r--. 1 user user 1073 4月 30 10:47 R2-Apr-30-14-47-11.101-8
-rw-r--r--. 1 user user 1093 4月 30 10:49 R1-Apr-30-14-49-56.023-11
-rw-r--r--. 1 user user 1073 4月 30 10:50 R2-Apr-30-14-50-11.460-9
-rw-r--r--. 1 user user 1106 4月 30 10:51 R1-Apr-30-14-51-57.355-12
-rw-r--r--. 1 user user 1106 4月 30 10:52 R1-Apr-30-14-52-56.856-13
-rw-r--r--. 1 user user 1073 4月 30 10:53 R2-Apr-30-14-53-11.594-10
-rw-r--r--. 1 user user 1083 4月 30 10:55 R1-Apr-30-14-55-58.039-14
-rw-r--r--. 1 user user 1073 4月 30 10:56 R2-Apr-30-14-56-11.761-11
-rw-r--r--. 1 user user 1083 4月 30 10:58 R1-Apr-30-14-58-59.227-15
-rw-r--r--. 1 user user 1073 4月 30 10:59 R2-Apr-30-14-59-11.901-12
-rw-r--r--. 1 user user 1105 4月 30 11:02 R1-Apr-30-15-02-00.102-16
-rw-r--r--. 1 user user 1073 4月 30 11:02 R2-Apr-30-15-02-12.252-13
-rw-r--r--. 1 user user 1105 4月 30 11:05 R1-Apr-30-15-05-00.981-17
-rw-r--r--. 1 user user 1073 4月 30 11:05 R2-Apr-30-15-05-12.392-14

CiscoルータのConfigをnetconfで取得する

CiscoルータのConfigをnetconfを使って取得しようという試み。
対象機器はCisco841M。IOSのバージョンは15.8。

netconf とは

ネットワーク機器をリモートで設定変更・更新・情報取得するためのプロトコル。
制御内容をXMLで記述する。RFC6241で規定。

CiscoではSSH(v2)でルータとセッションを張って, その中でやりとりを行う。

こちら「知ったかぶりしない NETCONF」でわかりやすくまとめられています。

ルータの設定

手順

1. SSH設定
2. netconf設定
3. netconf用ユーザ作成
4. 試行

1. SSH設定

(config)#ip domain name example.com
(config)#crypto key generate rsa
(config)#ip ssh version 2

2. netconf設定

(config)#netconf ssh

3. netconf ユーザ作成

(config)#username netconf privilege 15    !権限は15
(config)#ip ssh pubkey-chain
(conf-ssh-pubkey)#username netconf
(conf-ssh-pubkey-user)#key-string !pubkey 貼り付け
(conf-ssh-pubkey-user)#exit
(conf-ssh-pubkey)#end

もろもろ設定確認

#show ip ssh
SSH Enabled - version 2.0
#show netconf session
Netconf Sessions: 0 open, maximum is 4

4. 試行

SSHでルータへ接続する。netconf over SSHv2ということで-s オプションでnetconfを呼び出す。

$ssh -s -l netconf -i netconf_key 192.168.1.2 netconf

直ぐにルータからのhelloが届く。

# ルータからのhello
<?xml version="1.0" encoding="UTF-8"?>
<hello xmlns="urn:ietf:params:xml:ns:netconf:base:1.0">
<capabilities>
<capability>urn:ietf:params:netconf:base:1.0</capability>
<capability>urn:ietf:params:netconf:capability:writeable-running:1.0</capability>
<capability>urn:ietf:params:netconf:capability:startup:1.0</capability>
<capability>urn:ietf:params:netconf:capability:url:1.0</capability>
<capability>urn:cisco:params:netconf:capability:pi-data-model:1.0</capability>
<capability>urn:cisco:params:netconf:capability:notification:1.0</capability>
</capabilities>
<session-id>49242144</session-id>
</hello>
]]>]]>

session-idを消して応答を返せば, ここから制御が可能になる。

# ルータへの応答
<?xml version="1.0" encoding="UTF-8"?>
<hello xmlns="urn:ietf:params:xml:ns:netconf:base:1.0">
<capabilities>
<capability>urn:ietf:params:netconf:base:1.0</capability>
<capability>urn:ietf:params:netconf:capability:writeable-running:1.0</capability>
<capability>urn:ietf:params:netconf:capability:startup:1.0</capability>
<capability>urn:ietf:params:netconf:capability:url:1.0</capability>
<capability>urn:cisco:params:netconf:capability:pi-data-model:1.0</capability>
<capability>urn:cisco:params:netconf:capability:notification:1.0</capability>
</capabilities>
</hello>
]]>]]>

show runを取得してみる。

#送付するリクエスト
<?xml version="1.0" encoding="UTF-8"?>
<rpc xmlns="urn:ietf:params:xml:ns:netconf:base:1.0" xmlns:cpi="http://www.cisco.com/cpi_10/schema" message-id="101">
<get-config>
<source>
<running/>
</source>
</get-config>
</rpc>]]>]]>
#受け取った結果
<?xml version="1.0" encoding="UTF-8"?><rpc-reply message-id="101" xmlns="urn:ietf:params:xml:ns:netconf:base:1.0"><data><cli-config-data-block>!
! Last configuration change at 14:42:05 JST Fri Jan 18 2019 by netconf
! NVRAM config last updated at 12:22:11 JST Fri Jan 18 2019 by netconf
!
version 15.8
service timestamps debug datetime msec localtime show-timezone
service timestamps log datetime msec localtime show-timezone
no service password-encryption
service internal
!
~略~
ntp server ntp.nict.jp prefer
netconf ssh
!
</cli-config-data-block></data></rpc-reply>]]>]]>

XML形式で出力を得る場合は以下のようなリクエストを投げる。

<?xml version="1.0" encoding="UTF-8"?>
<rpc xmlns="urn:ietf:params:xml:ns:netconf:base:1.0" xmlns:cpi="http://www.cisco.com/cpi_10/schema" message-id="101">
<get-config>
<source>
<running/>
</source>
<filter>
<config-format-xml/>
</filter>
</get-config>
</rpc>
]]>]]>

終了するときはCtrl-cで終了。

次はsshコマンドではなくncclientを使って見よう。

余談

ちなみに, Configの出力をXML形式で取得したい場合は

show run | format

で取得できる。

また, Config取得でall オプションを使いたいときはGetメソッドを使うとできる。

<?xml version="1.0" encoding="UTF-8"?>
<rpc xmlns="urn:ietf:params:xml:ns:netconf:base:1.0"xmlns:cpi="http://www.cisco.com/cpi_10/schema" message-id="101">
<get>
<filter>
<oper-data-format-text-block>
<show>
run all
</show>
</oper-data-format-text-block>
</filter>
</get>
</rpc>
]]>]]>

この出力をXMLで取りたいなと思ったのだが, どうやらC841Mでは対応していないっぽい。specファイルを準備しないと駄目なのかな。

#show format
The following CLI are supported in built-in
show inventory
show ip interface brief
show waas token
show waas statistics peer
show waas statistics pass-through
show waas statistics lz
show waas statistics global
show waas statistics dre
show waas statistics dre peer
show waas statistics class*
show waas statistics aoim
show waas statistics auto-discovery
show waas statistics auto-discovery blacklist
show waas statistics application*
show waas alarms
show waas status extended
show waas status
show waas connection*
show waas auto-discovery list
show parameter-map type waas*
show class-map type waas*
show policy-map type waas*
show waas auto-discovery blacklist
show waas statistics errors
show waas accelerator
show waas accelerator detail
show waas accelerator ssl-express
show waas statistics accelerator ssl-express ciphers
show waas statistics accelerator ssl-express
show waas statistics accelerator ssl-express peering
show waas accelerator cifs-express
show waas statistics accelerator cifs-express
show waas statistics accelerator cifs-express detail
show waas accelerator http-express
show waas statistics accelerator http-express
show waas statistics accelerator http-express detail
show waas statistics accelerator http-express https
show waas cache http-express metadatacache*
show waas statistics accelerator http-express debug
show waas cache http metadatacache*