NW機器のTACACS+設定

およそ世間では情報が沢山あるので我が家の設定値のみ記載。

設定方針は次の通り。

  • 1号機は.20,2号機は.21,TACACSサーバがダウンしたらLocal認証(タイムアウトは5秒)
  • ログインできたら即特権(コマンド権限はTACACSサーバ側で握る)
  • 1号機を最初に記述,2号機を次に記述
  • aaaの設定でdefaultとして定義するものをよく見かけるが,自宅環境では不採用とし,各aaaの定義に名前を付ける。(仮にdefaultで定義すると全てのインタフェースに適用されるし,設定順番ミスるとそのままコマンドがはじかれるなどリスクがあると思う。ただし,line vty でのauthentication設定などは不要になるなど設定行は減る。)

Cisco IOS

!!! AAA有効
aaa new-model

!!! TACACSサーバ登録。aaa tacacs-server は非推奨になった模様。
tacacs server tacacs-sv1
 address ipv4 192.168.30.20
 key <tacacsサーバで設定したKey>
 timeout 5
tacacs server tacacs-sv2
 address ipv4 192.168.30.21
 key <tacacsサーバで設定したKey>
 timeout 5

!!! TACACSサーバグループ作成。
aaa group server tacacs+ TAC_SRV
 server name tacacs-sv1
 server name tacacs-sv2

!!! TACplusという名前でTAC_SRVで登録したTACACSサーバに問い合わせる。落ちてたらローカル認証。
aaa authentication login TACplus_authe group TAC_SRV local-case


!!! 実行権限をTACACSサーバに問い合わせる。落ちてたらローカル認証。
aaa authorization exec TACplus_autho_exec group TAC_SRV local

!!! 実行レベル15のコマンド実行権限をTACACSサーバに問い合わせる。落ちてたらローカル認証。
aaa authorization commands 15 TACplus_autho_cmd group TAC_SRV local

!!! コマンド実行ログをTACACSサーバへ送信。
aaa accounting commands 15 default start-stop group TAC_SRV


line vty 0 4
 exec-timeout 0 0
 authorization commands 15 TACplus_autho_cmd
 authorization exec TACplus_autho_exec
 logging synchronous
 login authentication TACplus_authe
 transport input ssh

Cisco ASA

ASAの場合はIOSとは若干違うが,基本的な定義の流れは同じ。

aaa-server TACplus protocol tacacs+
 reactivation-mode timed
 max-failed-attempts 2
aaa-server TACplus (mgmtside) host 192.168.30.20
 key *****
aaa-server TACplus (mgmtside) host 192.168.30.21
 key *****

!!! SSH接続時にTACACS→LOCALという順で認証
aaa authentication ssh console TACplus LOCAL

!!! 特権
aaa authentication enable console TACplus LOCAL

aaa authorization command TACplus LOCAL
aaa accounting command privilege 15 TACplus

!!! 
aaa authorization exec authentication-server auto-enable
aaa authentication login-history

以上。

TACACS+サーバ構築

概要

宅内環境の認証をTACACS化しようと,まずはTACACS+サーバを2台立てる。構成は次の通り。各機器の管理IFと同じセグメントにTACACSサーバを2台建てる。

OpenStack上にDebianイメージでインスタンスを1つ。冗長化のためESXi上にUbuntuのVMをたてて2号機とする。(なぜOSが違うかというと,ESXi上にDebian10のイメージがなかっただけで特に他意はなし)

TACACS+はtac_plusを利用する。元はこれ(https://www.shrubbery.net/tac_plus/)だと思うのだが,公開が終わっているっぽい。facebookがGithubでforkしたものを公開していたので,Ubuntu側ではここからソースをもってきてコンパイルしてインストールした。’Debianはリポジトリからインストールできた。)

インストール

Debian 10でのインストール方法

aptで一発。

# apt install tacacs+

Debain11でのインストール方法

11にはまだパッケージがなかったためソースからコンパイル。

# apt install git build-essential flex bison libwrap0-dev
$ git clone https://github.com/facebook/tac_plus.git
$ cd tac_plus/tacacs-F4.0.4.28
$ ./configure
$ make
# make install

続いて必要なファイルの準備。

サービス起動ファイル /etc/init.d/tacacs_plus

#!/bin/sh
### BEGIN INIT INFO
# Provides:          tacacs+
# Required-Start:    $network $local_fs $syslog $remote_fs
# Required-Stop:     $network $local_fs $remote_fs
# Should-Start:      $named
# Default-Start:     2 3 4 5
# Default-Stop:      0 1 6
# Short-Description: TACACS+ authentication daemon
### END INIT INFO

PATH=/usr/local/sbin:/usr/local/bin:/sbin:/bin:/usr/sbin:/usr/bin

DAEMON=/usr/local/sbin/tac_plus
NAME="tacacs+"
DESC="TACACS+ authentication daemon"
LOGDIR=/var/log/
STARTTIME=1

PIDFILE=/var/run/tac_plus.pid

test -x $DAEMON || exit 0

. /lib/lsb/init-functions

# Default options, these can be overriden by the information
# at /etc/default/$NAME
DAEMON_OPTS="-C /etc/tacacs+/tac_plus.conf"          # Additional options given to the server


LOGFILE=$LOGDIR/tac_plus.log  # Server logfile

# Include defaults if available
if [ -f /etc/default/$NAME ] ; then
        . /etc/default/$NAME
fi

# Check that the user exists (if we set a user)
# Does the user exist?
if [ -n "$DAEMONUSER" ] ; then
    if getent passwd | grep -q "^$DAEMONUSER:"; then
        # Obtain the uid and gid
        DAEMONUID=`getent passwd |grep "^$DAEMONUSER:" | awk -F : '{print $3}'`
        DAEMONGID=`getent passwd |grep "^$DAEMONUSER:" | awk -F : '{print $4}'`
    else
        log_failure_msg "The user $DAEMONUSER, required to run $NAME does not exist."
        exit 1
    fi
fi


set -e

running_pid() {
# Check if a given process pid's cmdline matches a given name
    pid=$1
    name=$2
    [ -z "$pid" ] && return 1
    [ ! -d /proc/$pid ] &&  return 1
    cmd=`cat /proc/$pid/cmdline | tr "\000" "\n"|head -n 1 |cut -d : -f 1`
    # Is this the expected server
    [ "$cmd" != "$name" ] &&  return 1
    return 0
}

running() {
# Check if the process is running looking at /proc
# (works for all users)

    # No pidfile, probably no daemon present
    [ ! -f "$PIDFILE" ] && return 1
    pid=`cat $PIDFILE`
    running_pid $pid $DAEMON || return 1
    return 0
}

start_server() {
# Start the process using the wrapper
    if check_config_quiet ; then
         start-stop-daemon --start --quiet --pidfile $PIDFILE \
                --exec $DAEMON -- $DAEMON_OPTS
         errcode=$?
         return $errcode
    else
         return $?
    fi

}

stop_server() {
    killproc -p $PIDFILE $DAEMON
    return $?
}

reload_server() {
    if check_config_quiet ; then
         [ ! -f "$PIDFILE" ] && return 1
         pid=`cat $PIDFILE` # This is the daemon's pid
         # Send a SIGHUP
         kill -1 $pid
         return $?
    else
         return $?
    fi
}

check_config() {
        $DAEMON -P $DAEMON_OPTS
        return $?
}

check_config_quiet() {
        $DAEMON -P $DAEMON_OPTS >/dev/null 2>&1
        return $?
}

force_stop() {
# Force the process to die killing it manually
        [ ! -e "$PIDFILE" ] && return
        if running ; then
                kill -15 $pid
        # Is it really dead?
                sleep "$DIETIME"s
                if running ; then
                        kill -9 $pid
                        sleep "$DIETIME"s
                        if running ; then
                                echo "Cannot kill $NAME (pid=$pid)!"
                                exit 1
                        fi
                fi
        fi
        rm -f $PIDFILE
}


case "$1" in
  start)
        log_daemon_msg "Starting $DESC " "$NAME"
        # Check if it's running first
        if running ;  then
            log_progress_msg "apparently already running"
            log_end_msg 0
            exit 0
        fi
        if start_server ; then
            # NOTE: Some servers might die some time after they start,
            # this code will detect this issue if STARTTIME is set
            # to a reasonable value
            [ -n "$STARTTIME" ] && sleep $STARTTIME # Wait some time
            if  running ;  then
                # It's ok, the server started and is running
                log_end_msg 0
            else
                # It is not running after we did start
                log_end_msg 1
            fi
        else
            # Either we could not start it
            log_end_msg 1
        fi
        ;;
  stop)
        log_daemon_msg "Stopping $DESC" "$NAME"
        if running ; then
            # Only stop the server if we see it running
                        errcode=0
            stop_server || errcode=$?
            log_end_msg $errcode
        else
            # If it's not running don't do anything
            log_progress_msg "apparently not running"
            log_end_msg 0
            exit 0
        fi
        ;;
  force-stop)
        # First try to stop gracefully the program
        $0 stop
        if running; then
            # If it's still running try to kill it more forcefully
            log_daemon_msg "Stopping (force) $DESC" "$NAME"
                        errcode=0
            force_stop || errcode=$?
            log_end_msg $errcode
        fi
        ;;
  restart|force-reload)
        log_daemon_msg "Restarting $DESC" "$NAME"
                errcode=0
        stop_server || errcode=$?
        # Wait some sensible amount, some server need this
        [ -n "$DIETIME" ] && sleep $DIETIME
        start_server || errcode=$?
        [ -n "$STARTTIME" ] && sleep $STARTTIME
        running || errcode=$?
        log_end_msg $errcode
        ;;
  status)

        log_daemon_msg "Checking status of $DESC" "$NAME"
        if running ;  then
            log_progress_msg "running"
            log_end_msg 0
        else
            log_progress_msg "apparently not running"
            log_end_msg 1
            exit 1
        fi
        ;;
  # Use this if the daemon cannot reload
  reload)
        log_daemon_msg "Reloading $DESC configuration files" "$NAME"
        if reload_server ; then
                if running ; then
                        log_end_msg 0
                else
                        log_progress_msg "$NAME not running"
                        log_end_msg 1
                fi
        else
                log_progress_msg "Reload failled"
                log_end_msg 1
        fi
        ;;
  check)
        check_config
        if [ X$? = "X0" ]
        then
                log_daemon_msg "Checking $DESC configuration files successful" "$NAME"
        else
                log_daemon_msg "Checking $DESC configuration files failed"
                exit 1
        fi
        ;;
  *)
        N=/etc/init.d/tacacs_plus
        echo "Usage: $N {start|stop|force-stop|restart|reload|force-reload|status|check}" >&2
        exit 1
        ;;
esac

exit 0

アカウンティングログファイル作成

# touch /var/log/tac_plus.acct

tacacs+設定ファイル編集(2台共通)

/etc/tacacs+/tac_plus

以下設定例。今回はとりあえず設定ファイル中にユーザを記述する設定方式をとったが,仕事ではやらないように注意。パスワードのハッシュ化は 「openssl passwd – 5」 (SHA256)で生成。

# アカウンティング用ログファイル指定
accounting file = /var/log/tac_plus.acct


# <サーバと通信するための鍵を記述>
key = tacacs_key

user = networkmanager {
        name = "Network Manager"
        member = admin
        login = des <ハッシュ化パスワード>
        enable = des <ハッシュ化enable>
}

user = networkoperator {
        name = "Read only user"
        member = operator
        login = des <ハッシュ化パスワード>
        enable = des <ハッシュ化enable>
}

# 管理者用グループ。Privilage15。
group = admin {
        default service = permit
        service = exec {
                priv-lvl = 15
        }

# オペレータ用グループ。showコマンドのみ利用可能
group = operator {
        default service = deny
        service = exec {
                priv-lvl = 15
        }
        cmd = show {
                permit .*
        }
        cmd = exit {
                permit .*
        }
}

TACACS+起動

# service tacacs_plus start

以上。

次はNW機器側の設定。

Horizon HTTPS化

前回インストールしたOpenstackのダッシュボードのHTTPS化についてのメモ。

流れ

  1. mod_ssl インストール
  2. 自己証明書作成
  3. httpd.conf編集
  4. nova.conf編集
  5. iptables設定編集
  6. サービス再起動

mod_sslインストール

# dnf install mod_ssl

証明書作成

# openssl req -new -key ./server.key > server.csr
# openssl x509 -req -signkey server.key < server.csr > server.crt

Apache設定ファイル編集

sslを読み込むように /etc/httpd/conf.module.d 配下に ssl.conf と ssl.load を作成。

# ssl.conf
<IfModule mod_ssl.c>
  SSLRandomSeed startup builtin
  SSLRandomSeed startup file:/dev/urandom 512
  SSLRandomSeed connect builtin
  SSLRandomSeed connect file:/dev/urandom 512

  AddType application/x-x509-ca-cert .crt
  AddType application/x-pkcs7-crl    .crl

  SSLPassPhraseDialog builtin
  SSLSessionCache "shmcb:/var/cache/mod_ssl/scache(512000)"
  SSLSessionCacheTimeout 300
  Mutex default
  SSLCryptoDevice builtin
  SSLHonorCipherOrder On
  SSLUseStapling Off
  SSLStaplingCache "shmcb:/run/httpd/ssl_stapling(32768)"
  SSLCipherSuite HIGH:MEDIUM:!aNULL:!MD5:!RC4:!3DES
  SSLProtocol all
  SSLOptions StdEnvVars
</IfModule>
#ssl.load
LoadModule ssl_module modules/mod_ssl.so

httpsで受けるように /etc/httpd/conf.d 配下の15-horizon_vhost.conf を編集。 15-horizon_ssl_vhost.conf を作成。

# 15-horizon_vhost.conf 編集箇所はリダイレクトのみ
  ## RedirectMatch rules
  RedirectMatch permanent  (.*) https://192.168.1.10
# 15-horizon_ssl_vhost.conf 
<VirtualHost *:443>
  ServerName 192.168.1.10

  ## Vhost docroot
  DocumentRoot "/var/www/"
  ## Alias declarations for resources outside the DocumentRoot
  Alias /dashboard/static "/usr/share/openstack-dashboard/static"


  ## Directories, there should at least be a declaration for /var/www/

  <Directory "/var/www/">
    Options -Indexes +FollowSymLinks +MultiViews
    AllowOverride None
    Require all granted
  </Directory>

  ## Logging
  ErrorLog "/var/log/httpd/horizon_ssl_error.log"
  ServerSignature Off
  CustomLog "/var/log/httpd/horizon_ssl_access.log" combined

  ## RedirectMatch rules
  RedirectMatch permanent  ^/$ /dashboard

  ## Server aliases
  ServerAlias 192.168.1.10
  ServerAlias localhost


  ## SSL directives
  SSLEngine on
  SSLCertificateFile      "/etc/pki/tls/certs/server.crt"
  SSLCertificateKeyFile   "/etc/pki/tls/private/server.key"

  ## WSGI configuration
  WSGIApplicationGroup %{GLOBAL}
  WSGIDaemonProcess horizon-ssl display-name=horizon group=apache processes=4 threads=1 user=apache
  WSGIProcessGroup horizon-ssl
  WSGIScriptAlias /dashboard "/usr/share/openstack-dashboard/openstack_dashboard/wsgi.py"
</VirtualHost>

nova.conf編集

ダッシュボード上のバーチャルコンソールもhttpsに対応させる。証明書は同じ物を転用した。/etc/nova/nova.conf の以下部分を編集。

# Disallow non-encrypted connections. For more information, refer to the
# documentation. (boolean value)
#ssl_only=false
ssl_only=True

# Set to True if source host is addressed with IPv6 (boolean value)
#source_is_ipv6=false

#
# Path to SSL certificate file. For more information, refer to the
# documentation. (string value)
#cert=self.pem
cert=/etc/pki/tls/certs/server.crt

#
# SSL key file (if separate from cert). For more information, refer to the
# documentation. (string value)
#key=<None>
key=/etc/pki/tls/private/server.key


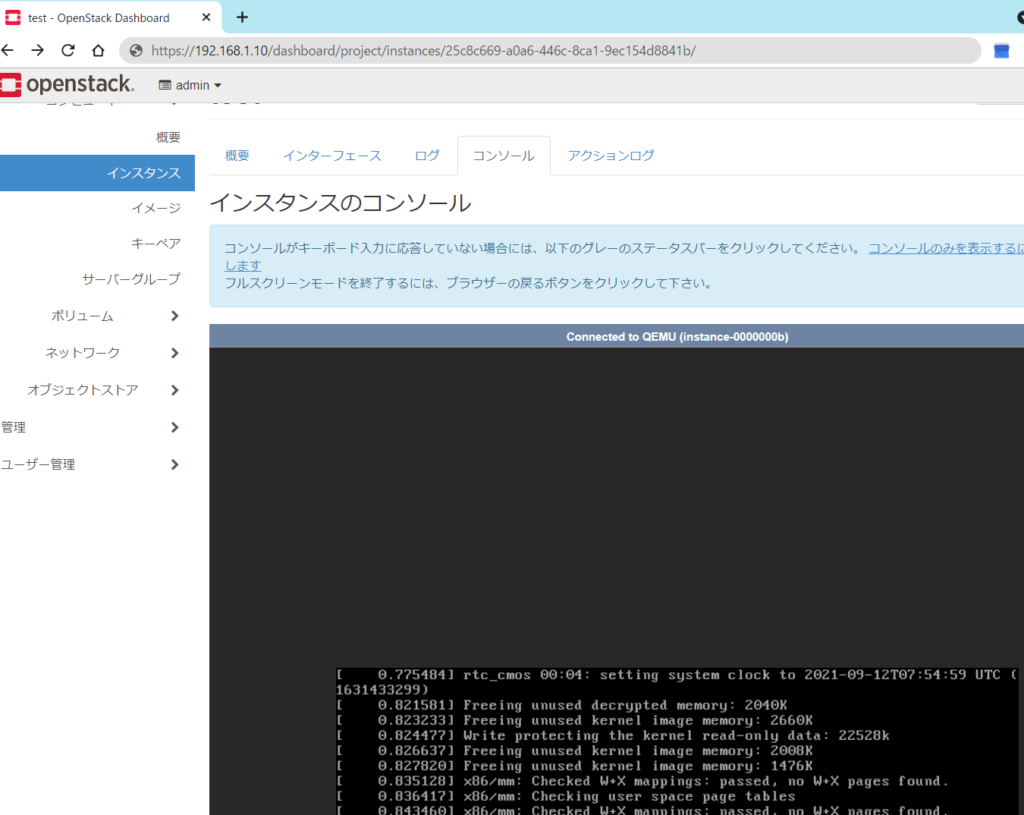
# /etc/nova/nova.conf:novncproxy_base_url=http://192.168.1.100:6080/vnc_auto.html
/etc/nova/nova.conf:novncproxy_base_url=https://192.168.1.100:6080/vnc_auto.html
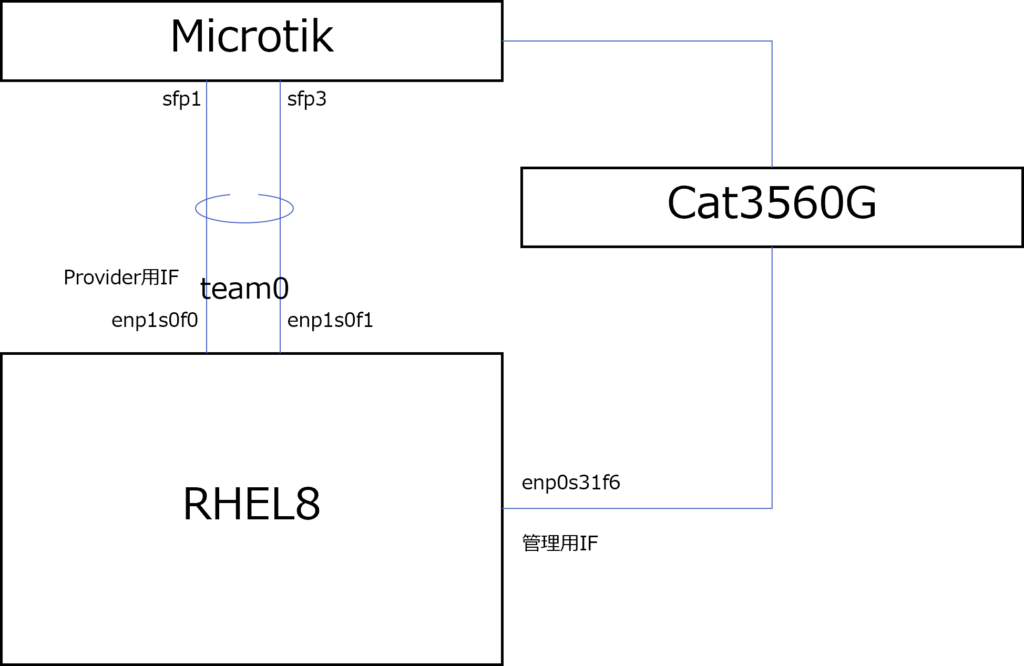
通信許可設定

packstack install時点でhttpsにしておかないとiptablesでtcp443が空いていないため,443の通信許可設定をiptablesに入れる。/etc/sysconfig/iptables に次の1行を追加。(ついでに80番は削除)

-A INPUT -p tcp -m multiport --dports 443 -m comment --comment "001 horizon 443 incoming" -j ACCEPT
# -A INPUT -p tcp -m multiport --dports 80 -m comment --comment "001 horizon 80 incoming" -j ACCEPT

サービス再起動

# systemctl restart httpd memcached
# systemctl restart *-nova-*

ここまでやればダッシュボードのHTTPS化完了。

RDOインストールメモ(RHEL8)

参考

https://www.rdoproject.org/install/packstack/

基本的に公式の手順にならって進める。

接続イメージ

事前準備

/etc/environment に以下追加。

LANG=en_US.utf-8
LC_ALL=en_US.utf-8

network周りの準備

network-scripts インストール,Network Manager 無効化,Firewalld無効化,SELinux無効化。

# dnf install network-scripts
# systemctl disable firewalld
# systemctl stop firewalld
# systemctl disable NetworkManager
# systemctl stop NetworkManager
# systemctl enable network
# systemctl start network

teaming設定

NetworkManagerを無効化したため,/etc/sysconfig/network-scripts 配下に以下ファイル作成&編集。

ifcfg-team0

DEVICE=team0
DEVICETYPE=Team
ONBOOT=yes
BOOTPROTO=none
TEAM_CONFIG='{"runner": {"name": "lacp", "active": true, "fast_rate": true, "tx_hash": ["eth", "ipv4"]}, "link_watch": {"name": "ethtool"}}'

ifcfg-enp1s0f0

NAME=enp1s0f0
DEVICE=enp1s0f0
ONBOOT=yes
TEAM_MASTER=team0
TEAM_PORT_CONFIG='{"prio": 0}'

ifcfg-enp1s0f1

NAME=enp1s0f1
DEVICE=enp1s0f1
ONBOOT=yes
TEAM_MASTER=team0
TEAM_PORT_CONFIG='{"prio":0}'

ifup team0で リンクアップさせ,ステータスを確認。

# ifup tema0
# teamdctl team0 state
setup:
  runner: lacp
ports:
  enp1s0f0
    link watches:
      link summary: up
      instance[link_watch_0]:
        name: ethtool
        link: up
        down count: 2
    runner:
      aggregator ID: 5, Selected
      selected: yes
      state: current
  enp1s0f1
    link watches:
      link summary: up
      instance[link_watch_0]:
        name: ethtool
        link: up
        down count: 2
    runner:
      aggregator ID: 5, Selected
      selected: yes
      state: current
runner:
  active: yes
  fast rate: yes

VLAN設定

team0ではVLAN trunk(802.1Q)で複数の外部ネットワークを指定できるようにしたいので,VLAN設定を行う。

# modprobe 8021q
# lsmod | grep 8021q
8021q                  40960  0
garp                   16384  1 8021q
mrp                    20480  1 8021q

外部ネットワーク用にteam0を割り当てるため,ifcfg-team0にOVS用の設定。

DEVICE=team0
DEVICETYPE=ovs
TYPE=OVSPort
OVS_BRIDGE=br_ex
ONBOOT=yes
BOOTPROTO=none
TEAM_CONFIG='{"runner": {"name": "lacp", "active": true, "fast_rate": true, "tx_hash": ["eth", "ipv4"]}, "link_watch": {"name": "ethtool"}}'

インストール

RDOリポジトリインストール & サブスクリプションでcodeready-builderを有効化。

# dnf install -y https://www.rdoproject.org/repos/rdo-release.el8.rpm
# subscription-manager repos --enable codeready-builder-for-rhel-8-x86_64-rpms

パッケージの更新。

# dnf update

Packstack installerのインストール。

# dnf install openstack-packstack

インストール。

#  packstack --allinone --provision-demo=n --os-neutron-ovn-bridge-mappings=extnet:br-ex --os-neutron-ovn-bridge-interfaces=br-ex:team0

VLANの設定が入っていなかったのでml2_config.iniを編集。

[ml2]
type_drivers=geneve,flat,vlan   #vlan追加
tenant_network_types=geneve
mechanism_drivers=ovn
path_mtu=0
extension_drivers=port_security,qos

[securitygroup]
enable_security_group=True

[ml2_type_geneve]
max_header_size=38
vni_ranges=10:100

[ml2_type_flat]
flat_networks=*

# ↓追記
[ml2_type_vlan]
# VLAN IDを指定しなければ任意のVLANを通せる
network_vlan_ranges=extnet

<略>

ip a で見るといけているっぽい。

10: team0: <BROADCAST,MULTICAST,UP,LOWER_UP> mtu 1500 qdisc noqueue master ovs-system state UP group default qlen 1000

openstack環境構築

ネットワークの作成

外部ネットワーク作成

まずは外部との接点となる外部ネットワークの作成。今回はスイッチ上でVLAN100で設定している192.168.1.0/24を指定する。(相変わらずOpenstackのネットワークの作成→サブネットの作成という流れに違和感を覚える。あまりネットワークにサブネットをぶら下げるメリットがあるようには思えないのだけど,この設計思想は一体どこからきたんだろうか・・・。)

openstack用に割り当てたレンジ(192.168.1.120~192.168.1.129)をDHCPのレンジで設定する。

$ openstack network create --provider-network-type vlan --external --provider-physical-network extnet --provider-segment 100 --share VLAN100
$ openstack subnet create --network VLAN100 --subnet-range 192.168.1.0/24 --dhcp --gateway 192.168.1.1 --allocation-pool start=192.168.1.120,end=192.168.1.129 --dns-nameserver 1.1.1.1 subnet_V100

内部ネットワーク作成

続いて内部ネットワークの作成。172.16.1.0/24,GWは末尾1,DHCPプールは50~100とした。

$ openstack network create internal01
$ openstack subnet create --network internal01 --gateway 172.16.1.1 --subnet-range 172.16.1.0/24 --dhcp --dns-nameserver 1.1.1.1 --allocation-pool start=172.16.1.50,end=172.16.1.100  subnet01

ルータ作成

最後にルータの作成,外部ネットワークの接続,内部ネットワークの接続。

$ openstack router create ext-router
$ openstack router set --external-gateway VLAN100 --enable-snat --fixed-ip ip-address=192.168.1.4 ext-router
$ openstack router add subnet ext-router subnet01

シンプルな構成のできあがり。

外部と内部をルータでつなげただけの構成

イメージ作成

テスト用にcirrosのイメージを作成。ここからwgetで持ってきて,7zを解答。vmdkファイルを結合してqcow2へ変換する。

$ qemu-img convert -O qcow2 ./Kali-Linux-2021.2-vmware-amd64.vmdk kali-linux-2021.2.qcow2
$ openstack image create "cirros" --file ./cirros-0.5.2-x86_64-disk.img --disk-format qcow2 --container-format bare --public

インスタンスの起動はダッシュボードからポチポチやって(ここは省略),無事に起動確認。(そういえば,デフォルトパスワードがUS配列の影響をうけないものに変わって嬉しいw)

無事にpingも通った。

NICのTeaming設定(RHEL)

想定構成

以下構成で10GbpsのNICを2本束ねる。

参考URL  nmcli を使用したネットワークチーミングの設定

  1. チーミングインタフェースを作成
  2. 物理IFをチーミングに所属
  3. チーミングIFを有効化

teamingを設定する方法にはいくつかあるが,ここでは公式ドキュメント最初に出てくるnmcliを利用して設定する。なお,teamdは永続性がないためnmcliやifcfgファイルで設定する方がよさそう。

想定する設定は,

  1. interfaceは「enp1s0f0」「enp1s0f1」の2つを利用。
  2. LACP利用
  3. 送信負荷分散のハッシュ値にmac address(scx/dst), ip address(src/dst), tcp port(src/dst) の3つを含める。

Teamingインタフェース作成

nmcliコマンドでTeamingの論理インタフェースを作成する。

# nmcli connection add type team ifname team0 con-name team0 config '{"device": "team0", "runner": {"name": "lacp", "active": true, "fast_rate": true, "tx_hash":  ["eth", "ipv4", "ipv6", "l4"]}, "link_watch": {"name": "ethtool"}}'
接続 'team0' (380df2de-dcef-4436-aded-9c4ab20e13e6) が正常に追加されました。

team0に所属させるインタフェースを設定する。オプションで「con-name」をつけると別名でインタフェースを定義できるが指定しないと「team-slave-enp1s0f0」のようになる。

# nmcli con add type team-slave ifname enp1s0f0 master team0
# nmcli con add type team-slave ifname enp1s0f1 master team0

IFの有効化

物理IF,TeamingIFのどちらを有効にしてもよい。

# nmcli con up team-slave-enp1s0f0
接続が正常にアクティベートされました (D-Bus アクティブパス: /org/freedesktop/NetworkManager/ActiveConnection/22)
# nmcli con up team-slave-enp1s0f1
接続が正常にアクティベートされました (D-Bus アクティブパス: /org/freedesktop/NetworkManager/ActiveConnection/25)

# nmclie con up team0
# ip link
18: team0: <NO-CARRIER,BROADCAST,MULTICAST,UP> mtu 1500 qdisc noqueue state DOWN mode DEFAULT group default qlen 1000
    link/ether 00:1b:21:6e:82:1d brd ff:ff:ff:ff:ff:ff

IPアドレスが設定されないとUPにならないが,後々内部ブリッジに接続させる予定なので今回はここまで。

cronの期間指定

cronの書き方で毎度悩む期間指定。めったに触らないから調べても忘れる。

ということでメモ。

基本的な記述は,「分,時,日,月,曜日」の5つのフィールドに指定したい値を書く。

cron(8) examines cron entries every minute.

The time and date fields are:

    field          allowed values
     -----          --------------
     minute         0-59
     hour           0-23
     day of month   1-31
     month          1-12 (or names, see below)
     day of week    0-7 (0 or 7 is Sunday, or use names)

毎時,毎月などは スラッシュで指定する。例えば「2時間毎に」としたいならば

* */2 * * * 

とする。それは分かる。だがしかし,これは何処を起点に2時間をカウントしはじめるのだろう,設定した時間からカウント始めるのか?それとも0時0分をスタートとして0,2,4,6,8,10,12,・・・としていくのだろうか?と毎度分からなくなる(忘れる)。ソースコードを読み解けば分かるのかもしれないが,そんな技量はないので実際に設定して確認する。

*/3 * * * * date >> /home/user/check

このときの実行状況は以下の通り。

2021年  3月 13日 土曜日 10:18:01 JST
2021年  3月 13日 土曜日 10:21:01 JST
2021年  3月 13日 土曜日 10:24:01 JST
2021年  3月 13日 土曜日 10:27:01 JST
2021年  3月 13日 土曜日 10:30:01 JST
2021年  3月 13日 土曜日 10:33:01 JST
2021年  3月 13日 土曜日 10:36:01 JST
2021年  3月 13日 土曜日 10:39:01 JST

0分からカウントされているっぽい。では41分に4分間隔に変更するとどうだろう。

*/4 * * * * date >> /home/user/check

41分からカウント開始とするなら45分に実行されるはずだが,0分スタートとするならば,44分に実行されるはず。

2021年  3月 13日 土曜日 10:39:01 JST
2021年  3月 13日 土曜日 10:44:01 JST

44分。デスヨネ。なんとなく気づいていましたよ。everyや毎にという言葉が悪い(違。

ただ,そうすると「50分毎に」や「9ヶ月毎に」など時刻ベースではなく純粋に時間間隔で実行したいときはどうするのだろう。

50 * * * *

とすると,0時50分,1時50分,2時50分と毎時50分になる。cronではそういうことは想定していないのだろうな。そもそもマニュアルに“run this command at this time on this date”ってあるしね・・・。個別にスクリプトを書くしかないのか。

Catalyst3560CでGREトンネル

とある検証でL3SWでGREトンネルのみ張る設定を確認した。普通にいけるかなと思ったが,keepaliveでひっかかったのでメモ。

基本的には,Vlan IFにIPアドレスを設定し,tunnel source / destination でそれぞれ指定すれば完了。ただし,Keepaliveを設定するとDownとなる。デバッグをとっても応答が返ってこず(recieveが無い)Down判定されていた。

interface Tunnel1
 ip address 192.168.254.2 255.255.255.252
 keepalive 5 2
 tunnel source Vlan1
 tunnel destination 192.168.10.1

なんでだろうなと調べてみると,以下の一文を見つけた。

Support is available for gre ip tunnel mode. The tunnel source can be loopback and Layer 3 (physical or Etherchannel) interfaces only.

https://www.cisco.com/c/dam/en/us/td/docs/switches/lan/catalyst3850/software/release/16-1/workflows/gre-feature-guide.pdf

なるほど。型番もバージョンも違うけれどこれっぽい。試しにip routingを有効にしてLoopback IFを追加,対向のLoに対するスタティックルート追加したところ無事にkeepalive有りでトンネルが張れた。

枯れた技術だけれど,結構まだハマるところがあるという。精進が足りませんね。

Microsoft Azure Fundamentals

先日,Microsoftのオンラインセミナー受講したらバウチャーを配布してくれたので受験してきました。
Azureの初級という位置づけで,「クラウド初めてさわる」「これからAzure案件に関わる予定」という人向けのようです。(個人的には新人のスキルアップに丁度良い教材&資格ではないかと思っています。)

私自身は初心者ではありませんが,Azureというクラウドサービスを理解するというきっかけには丁度良い試験でした。もちろんセミナーを受けただけでは受からないので

  • Microsoftのラーニングパスを通して理解を深める。
  • Azureアカウントを作成して一通り操作や見方を覚える。

と,ある程度対策をしたうえで受験し,無事に合格しました。

個人的にオススメラーニングパスは以下の通り。

Microsoft Azure クラウドの概念について調べる (AZ-900) ・・・ 4つのモジュールがあり,これはオンラインセミナーと結構重複していたので,復習のためやっておくと良い。

Azure の基礎 ・・・ 12個のモジュールがある。実際にAzureを操作してVMや可用性ペアを作るなどのハンズオンが盛り込まれている。まったくのクラウド初心者だと,これくらいまでは最低限やっておかないと厳しいかもしれない。

以下のモジュールでさらに理解を深めておくと余裕をもっていけるはず。ただ,受けた感想として,クラウド一般的な技術の話というよりは,Azureに特化したサービス(ポリシー/課金/サポート)に重点を置いて対策をとったほうがよいと感じた。

Azureを触ってみてAWSとは違う使いやすいさ,チュートリアルの豊富さが良いと感じたので今後個人的にも使ってみよう。

WordPress構築

Bloggerを使っていたけれど,使い勝手がよいWiki形式へ切り替えたいと思い,勉強がてらWordpressを自前で立ててこちらへ引っ越し。

1発目はWordpress構築メモ。

構想

イメージ
構成概要

構成イメージはこのような感じ。GCP上にCentOS8の仮想マシンを1つたて,その上で完結させる。DBは分けた方がよいのだろうが,まずは無事に立ち上がるところまで。

ドメインはさくらインターネットで取得。.comドメインで年間1886円。GCPでグローバルIPアドレスを確保した後,設定画面でDNS登録をする。

大まかな流れ

  1. DBインストール,設定
  2. PHPインストール,設定
  3. HTTPDインストール,設定
  4. HTTPS化

いざゆかん。

とその前に,構築中は自宅からのみアクセス可能とするためGCPのファイアウォールでソースIPアドレスを限定する。

DBインストール,設定

オフィシャルサイトを参考。

$ sudo dnf install mariadb-server.x86_64

DBセキュア化

$ sudo mysql_secure_installation

NOTE: RUNNING ALL PARTS OF THIS SCRIPT IS RECOMMENDED FOR ALL MariaDB
      SERVERS IN PRODUCTION USE!  PLEASE READ EACH STEP CAREFULLY!

In order to log into MariaDB to secure it, we'll need the current
password for the root user.  If you've just installed MariaDB, and
you haven't set the root password yet, the password will be blank,
so you should just press enter here.

Enter current password for root (enter for none):
OK, successfully used password, moving on...

Setting the root password ensures that nobody can log into the MariaDB
root user without the proper authorisation.

Set root password? [Y/n] y
New password:
Re-enter new password:
Password updated successfully!
Reloading privilege tables..
 ... Success!

By default, a MariaDB installation has an anonymous user, allowing anyone
to log into MariaDB without having to have a user account created for
them.  This is intended only for testing, and to make the installation
go a bit smoother.  You should remove them before moving into a
production environment.

Remove anonymous users? [Y/n] y
 ... Success!

Normally, root should only be allowed to connect from 'localhost'.  This
ensures that someone cannot guess at the root password from the network.

Disallow root login remotely? [Y/n] y
 ... Success!

By default, MariaDB comes with a database named 'test' that anyone can
access.  This is also intended only for testing, and should be removed
before moving into a production environment.

Remove test database and access to it? [Y/n] y
 - Dropping test database...
 ... Success!
 - Removing privileges on test database...
 ... Success!

Reloading the privilege tables will ensure that all changes made so far
will take effect immediately.

Reload privilege tables now? [Y/n] y
 ... Success!

Cleaning up...

All done!  If you've completed all of the above steps, your MariaDB
installation should now be secure.

Thanks for using MariaDB!

wordpress用DB設定。

MariaDB [(none)]> CREATE DATABASE wordpress;
Query OK, 1 row affected (0.004 sec)


MariaDB [(none)]>


MariaDB [(none)]> GRANT ALL PRIVILEGES ON wordpress.* TO "DBアドミン名"@"localhost" IDENTIFIED BY "パスワード";
Query OK, 0 rows affected (0.004 sec)


MariaDB [(none)]> FLUSH PRIVILEGES;
Query OK, 0 rows affected (0.002 sec)

ログに認証エラーが出た。ケルベロス認証などは使わないので無効化で対処する。

[ERROR] mysqld: Server GSSAPI error (major 851968, minor 2529639093) : gss_acquire_cred failed -Unspecified GSS failure. Minor code may provide more information. Keytab FILE:/etc/krb5.keytab is nonexistent or empty.
/var/log/mariadb/mariadb.log の内容
$ sudo mv /etc/my.cnf.d/auth_gssapi.cnf /etc/my.cnf.d/auth_gssapi.cnf.org

起動設定。

$ systemctl enable mariadb
$ systemctl start mariadb

PHPインストール,設定

$ sudo dnf install php php-mysqlnd php-mbstring.x86_64 php-json php-gd php-xml php-zip php-dom

php-gdがないとwordpress上で画像の編集ができない

推奨

参考) https://qiita.com/kogache/items/00dc37774dfe20f03a72

/etc/php-fpm.d/www.conf 編集。httpdとしてnginxを使うのでユーザとグループを修正する。

; Unix user/group of processes
; Note: The user is mandatory. If the group is not set, the default user's group
;       will be used.
; RPM: apache user chosen to provide access to the same directories as httpd
;user = apache
user = nginx
; RPM: Keep a group allowed to write in log dir.
;group = apache
group = nginx

nginxインストール,設定

$ sudo dnf install nginx

wordpress設定

wordpressもあわせてインストールをする。今回は /usr/share/nginx の下に WP というディレクトリを作成して,そこへwordpressを配置する。

$ wget https://ja.wordpress.org/latest-ja.tar.gz
$ tar xvfz latest-ja.tar.gz ./
$ sudo chown -R nginx:nginx /usr/share/nginx/WP
$ sudo mv wordpress/* /usr/share/nginx/WP/

nginx設定ファイル変更。 /etc/nginx/conf.d/wp.conf として編集。TLS1.2 と1.3に限定する。こちらを参考。

# HTTPSへリダイレクト
server {
        listen 80;
        server_name zassoul.com;
        return 301 https://$host$request_uri;
}
server {
        listen 443 ssl;
        server_name zassoul.com;
        root /usr/share/nginx/WP;
        index index.php;
        charset utf-8;

        ssl_certificate /etc/letsencrypt/live/zassoul.com/fullchain.pem;
        ssl_certificate_key /etc/letsencrypt/live/zassoul.com/privkey.pem;
        ssl_protocols TLSv1.2 TLSv1.3;
        ssl_prefer_server_ciphers on;

        location = /favicon.ico {
                log_not_found off;
                access_log off;
        }

        location / {
                try_files $uri $uri/ /index.php?$args;
        }

        # Deny to wp-config.php
        location ~* /wp-config.php {
                deny all;
        }

        #php-fpm
        location ~ \.php$ {
                try_files $uri = 404;
                fastcgi_split_path_info ^(.+\.php)(/.+)$;
                include fastcgi_params;
                fastcgi_index index.php;
                fastcgi_param SCRIPT_FILENAME $document_root$fastcgi_script_name;
                fastcgi_pass php-fpm;
        }

        location ~* \.(js|css|png|jpg|jpgeg|gif|ico)$ {
               expires max;
               log_not_found off;
        }
}

wp-config.php を編集する。(オフィシャルサイトを参考)

// ** MySQL 設定 - この情報はホスティング先から入手してください。 ** //
/** WordPress のためのデータベース名 */
define( 'DB_NAME', 'wordpress' );

/** MySQL データベースのユーザー名 */
define( 'DB_USER', '上で設定したユーザ名' );

/** MySQL データベースのパスワード */
define( 'DB_PASSWORD', '上で設定したパスワード' );

/** MySQL のホスト名 */
define( 'DB_HOST', 'localhost' );

/** データベースのテーブルを作成する際のデータベースの文字セット */
define( 'DB_CHARSET', 'utf8mb4' );

/** データベースの照合順序 (ほとんどの場合変更する必要はありません) */
define( 'DB_COLLATE', '' );

/**#@+
 * 認証用ユニークキー
 */
define( 'AUTH_KEY',         'ジェネレートしたキー' );
define( 'SECURE_AUTH_KEY',  'ジェネレートしたキー' );
define( 'LOGGED_IN_KEY',    'ジェネレートしたキー' );
define( 'NONCE_KEY',        'ジェネレートしたキー' );
define( 'AUTH_SALT',        'ジェネレートしたキー' );
define( 'SECURE_AUTH_SALT', 'ジェネレートしたキー' );
define( 'LOGGED_IN_SALT',   'ジェネレートしたキー' );
define( 'NONCE_SALT',       'ジェネレートしたキー' );

/**#@-*/

HTTPS化

常時HTTPSもするのでLet’s EncryptでSSL証明書を発行する。サイト認証のため80番ポートでアクセスしてくる必要があるということで,一時的に80番ポート全解放をする。

こちらを参考にLet’s Encryptで証明書発行を実施。

Certbotのインストール。

$ sudo dnf install epel-release
$ sudo dnf install certbot

お試しdry-run。

$ sudo certbot certonly --dry-run --standalone -w /usr/share/nginx/WP/ -d zassoul.com -m "Email-Address"

本番実行。

$ sudo certbot certonly  --standalone -d zassoul.com -m "Email-Address" --agree-tos
Saving debug log to /var/log/letsencrypt/letsencrypt.log
Plugins selected: Authenticator webroot, Installer None
Obtaining a new certificate
Performing the following challenges:
http-01 challenge for zassoul.com
Using the webroot path /usr/share/nginx/WP for all unmatched domains.
Waiting for verification...
Cleaning up challenges
Subscribe to the EFF mailing list (email: "Email-Address").


IMPORTANT NOTES:
 - Congratulations! Your certificate and chain have been saved at:
   /etc/letsencrypt/live/zassoul.com/fullchain.pem
   Your key file has been saved at:
   /etc/letsencrypt/live/zassoul.com/privkey.pem
   Your cert will expire on 2020-12-07. To obtain a new or tweaked
   version of this certificate in the future, simply run certbot
   again. To non-interactively renew *all* of your certificates, run
   "certbot renew"
 - If you like Certbot, please consider supporting our work by:


   Donating to ISRG / Let's Encrypt:   https://letsencrypt.org/donate
   Donating to EFF:                    https://eff.org/donate-le

ここで80番を閉じる。nginx起動設定。

$ sudo systemctl enable nginx
$ sudo systemctl start nginx

完了。